The good thing about a home environment is that you can give free rein to your imagination and, without being embarrassed by prying eyes, realize even the most extravagant ideas for a photo shoot for girls at home. It’s not always possible to immediately come up with original poses for photo shoots at home, especially when the decor of a city apartment or house has already become familiar, but there is no theme for shooting.
That is why it is important for girls to choose a shooting location in advance and work out all the nuances for the photo shoot. We offer 10 of the most popular ideas, from which it is easy to choose the best ones.
Photo in a city apartment or house
The most common idea is the life of a girl. Even in an ordinary setting, you can get memorable pictures by taking the right poses in an original image.
For girls, ideas for household photography can include washing dishes and cooking in the kitchen, ironing and laundry, even washing a window.
The main thing is to place the right accents:
- Pay attention to makeup, for example, bright red lipstick
- Make a hairstyle to match the chosen images (glamorous, modest, intelligent)
- Work on your clothing style, for example, wear a maid uniform and lace stockings with garters, high-heeled shoes
- Choose a setting that suits your chosen theme and take an advantageous pose that shows off your beautiful figure.
Using this idea for photo shoots, you can show not only your thriftiness, but also your sexuality.
Filming with my husband
You can use your husband’s hobby as an idea for girls at home. Play out a scene when a man is busy with work, and you distract him with your concern. The occupation, as well as the location of family filming, can be absolutely anything, examples:
- Household chores
- Book reading
- Watching a football match
- Computer game
The couple can choose sexy images and do a photo shoot on the kitchen table. For such a shoot, wear bright makeup. In anticipation New Year's holidays You can organize a family shoot that will look romantic. To do this, just fill glasses with champagne and feed each other goodies.
It is best to choose a topic that is closest to your husband. This will help to liberate him so that the photographer can take beautiful and unusual photographs.
Photo on the floor
To make a photo shoot for girls bright, you need to choose not only ideas, but also suitable poses. This is true if you decide to take photographs on the floor. Under such conditions, both the photographer and the model herself must ensure that everything looks not only beautiful, but also natural. Sitting on the floor and changing the position of your hands near your face, crossing your legs, showing off a beautiful figure, can take a great photo.
Also a good angle for a photo shoot would be when the girl is lying on the floor. The shorter the skirt you are wearing, the more frivolous the staged shot will be.
If you have a fireplace, pose in front of it - a great option for New Year's photography. Use furniture (chair, chair) with your feet or head on it. To look cute, wear a warm sweater, sexy - lace underwear, stylish - a dress.
Decorate the interior with unusual lamps, pillows, animal skin or a white fluffy carpet.
Photo on the bed or sofa
Great idea for photography in home environment One of the ways to take a couple of relaxed photographs is to take photographs on the bed. For candid shots, wear something nice. underwear, emphasizing the dignity of the figure. A good solution for such a shoot would be to lie on your back and put your head on the edge so that your hair flows smoothly down. Also, for erotic photography, you can undress completely, sit with your back to the photographer and cover your hips, and tilt your head slightly.
Using a bed, but changing the conditions and choosing a different angle to implement the idea, you can get not only candid shots. A good photo will be taken if the girl is sitting on the bed and has a book or a mug of coffee in her hands. A short skirt or negligee would be inappropriate as clothing; it is best to wear flannelette pajamas or a robe, jeans with a knitted sweater. If your feet are going to be in the frame, you need a pair of brightly colored socks.
Family photography with mom
For shooting, you can use any room in a city apartment. The main idea for the photo is to demonstrate a warm relationship. Of course, you can wear similar outfits and fool around, but it’s better to work out the themes of the shoot in advance.
For such a photoset you need to use warm colors, knitted items, blankets. It is better to keep your makeup discreet. Fruits or fresh flowers will look great in the frame. Just imagine the shot - the mother is sitting in a chair, wrapped in a blanket, and the girls are located at her feet, resting their heads on her knees. You can sit on the floor together, leaning your backs against each other. The frame on the bed will look cute when mommy tenderly hugs her daughter.
An interesting family photo would be taken at the dinner table, in which both heroines, like friends, will be holding large mugs of tea in their hands or looking at a magazine.
Shooting with a toy
Using soft toys in the frame, girls can take themselves back to childhood for a moment. Large teddy bears look appropriate in such sessions, but this does not mean that in the absence of a large bear you cannot take unusual pictures. You can always take a few cubs. A close-up shot with a teddy bear sitting next to the girl’s face will look beautiful.
When doing a photo shoot with teddy bears, use them as pillows. You can also organize a tea party with your children’s “friends” for filming. Even an old, shabby Cheburashka will look good on camera if you transform into a little girl. To do this, just put on knee socks and braid your hair. During such photography, you can transform yourself not only into a little girl, but also into a caring mother, and into a woman who has received a gift from her beloved man.
Maternity photography
Some of the most tender and incredibly sensual are photographs of women preparing to become mothers, especially if there is a caring man in the frame. In this position, a woman feels most comfortable in a familiar environment.
Take a full-length photo every month showing your changing belly size. This way you can capture the entire pregnancy and then make a collage.
For longer periods of time, you can decorate the baby’s “house” or decorate it with large inscriptions, examples:
- Made with love
- I'll be with you soon
- I want to see the world
For family photos, you can involve your husband, parents, and girlfriends. Shots with pregnant women sitting half-turned on the bed in a white shirt look good. You can completely undress, covering only parts of your body with silk fabric, showing your rounded belly.
If you want to focus specifically on your tummy, getting an original shot, sit on the bed sideways with your legs tucked under you. These photos look great in black and white. The big advantage is that you don't have to wear makeup.
Footage with a baby
If you are a young mother, take original home photos with your baby. To do this, it is enough to use a floor covered with a plain fabric and simple objects(magazines, mugs, drawings, clothes, baby rattles). You can depict weightlessness by sitting with your baby on the carpet so that there is space below and above in the frame.
To get tender shots filled with warmth and love that will not leave anyone indifferent, take a photo with your sleeping baby.
Portrait photography
Exists a large number of options for implementing portrait photography suitable for girls. One of the best solutions would be to use a window. If you stand against the background of a window, your silhouette will look very advantageous from the side of the room. Wear a dress, negligee, shorts, leggings. Any set that will highlight the beauty of your figure will do. Put your shoes on high heels or stay barefoot.
If you have a bright bedroom, create your “perfect” morning. Prepare breakfast in bed, put flowers in a vase, put a mountain of pillows. Makeup for such a shoot should look natural.
Photography with animals
Shooting girls with animals is becoming increasingly popular, because you can take touching pictures with them, or you can fool around and get funny shots. Absolutely any images and animals are suitable for such shooting, examples:
- Cat or dog
- Hamster or guinea pig
- Parrot and even turtle
Using animals in the frame and simple things, you can create custom photos. The main condition will be to captivate the animal with the process. You can take a photo of playing with a cat or dog. Such a frame will turn out positive, especially in sunny day. Play with the slogan “Catwoman” or the famous painting “Lady with an Ermine”. For shots with animals, you can wear simple pants, a dress or pajamas.
You can also use an animal for New Year's photography. To create the look, just put on the caps or put it in a bright red bag with gifts. In any case, you will look interesting in the photo.
Use the listed ideas for a photo shoot of girls at home, and your realized images will become not just snapshots, but will turn into interesting artistic paintings.
Guys, we put our soul into the site. Thank you for that
that you are discovering this beauty. Thanks for the inspiration and goosebumps.
Join us on Facebook And In contact with
The main commandment of smartphone photography: it doesn’t matter how cool the camera is, what matters is who’s holding it. And with the most luxurious DSLR you can take clear, but boring photographs. The kind that lie on disk and no one opens them for years.
And you can take interesting photos with your smartphone, especially since this equipment is always with you, you don’t have to uncover it for a long time and you won’t forget to remove the lens cap. And for the most part, smartphones are cheaper than DSLRs, which is also very pleasing.
website I’ve put together some tips for you on how to take cool photos using your smartphone.
Programs
A camera in a smartphone is, first of all, a program that maintains the lens and matrix. Therefore, you should not stop at what Android or iOS dictates to you. You may want to use different programs to different cases shooting. Some give more interesting color rendition, others - slightly larger plans: Pudding Camera, CameraMX, Photosynth, VSCO Cam, Slow shutter cam, Pro HDR, Camera+, etc. Why limit yourself if you have a choice?
Having chosen a program, it’s worth delving into the settings. Set high resolution images, remember what you can difficult cases play with white balance, ISO and disable autofocus. And in general, find out what interesting things a specific program can do.
Zoom
Cropping as a replacement for zoom.
It’s better to forget once and for all that your smartphone has digital zoom. Such an increase in most cases is achieved by serious losses in image quality. The best zoom is the legs: come closer, move further away.
If this is not possible, then it is wiser to cut out the frame you need from a large photograph during post-processing. The cropping function is available even in the simplest programs. Plus, you don’t waste time adjusting the size, you just take it off. And already in a calm environment, you correctly compose the frame, without missing details that you could accidentally crop out while using the zoom in the field.
Series
Take several shots of the same scene. Subsequently, you can choose the most successful photo and work with it. And, before deleting photos from your smartphone, it’s a good idea to view them on your computer, since you may not notice them on your phone’s small screen nice photos just because they will appear overexposed or underexposed.
If it doesn’t turn out interesting, you should change the shooting angle.
When photographing something or someone, don't be afraid to change angles. You can take a photo head-on, or you can change the angle a little and get an interesting shot. Moreover, the compact size of the smartphone allows you to take angles for which a photographer with a large camera will have to work hard.
Light
The flash on a smartphone should be used very carefully. As a rule, it “deads” the photo, distorts colors and shadows. Flash is only good when you need to take pictures immediately, otherwise you'll miss the moment.
At the same time, light is main tool photographer This is important for professional cameras, but for smartphones it is much more important. Therefore, always look for the light, pay close attention to how it falls on the subject, and you will get the shot.
Good light in the morning and evening. On a sunny afternoon, you will have to work with too high a contrast, which threatens with artifacts in the pictures. The pre-storm sky gives luxurious effects.
Object shooting
On the left is a photo with a lack of lighting, on the right is with a flashlight.
If you want to take a photo of something or someone at home, the smartphone can become stubborn - there is rarely enough light in the room. But you can take a simple LED flashlight and a sheet of white paper to compensate for the too harsh shadow. Let's say a flashlight is shining from above on the right, we bring a sheet of white paper to the left, which reflects the light of the flashlight and additionally illuminates the object, and press the button on the phone.
Lens Cleanliness
Frame through a fingerprint.
It would seem that an obvious thing is the cleanliness of the lens, but smartphone lovers often come across this issue. The phone is used constantly, lies in your pocket, and when you take it to answer a call or SMS, the last thing you remember is that you left a fingerprint on the glass of the lens. When shooting, this print gives, of course, a slight mysterious blur, but, as a rule, this is the effect you do not expect in the intended photo.
Response delay
It is important to take into account the fact that the shooting program in a smartphone in most cases operates with a delay. You have already pressed the button, but the camera is still thinking before taking a photo. Therefore, it is important to think proactively, like a hunter who shoots not at a hare, but at the place where, according to his assumption, the hare will be at the next moment.
Let's say you are photographing a flower in a field, and it is windy on that day, you need to take into account the speed of the camera and at the same time capture the moment between gusts of wind. It’s difficult, but the result will be more valuable due to the effort spent.
Post-processing programs
Simplest editing on Instagram.
Most professional photographers do post-processing of photographs, absolutely always in commercial photography, but for smartphone photography this is a vital necessity. You cannot adjust the shutter speed and aperture on a smartphone. This limitation is compensated for by a variety of post-processing programs. This is beyond the well-known Instagram and Flickr.
- VSCO Cam. Allows you to apply a variety of filters and settings. Distributed free of charge.
- Afterlight. Good for color correction. Costs 34 rubles.
- Touch retouch. This simple tool allows you to remove minor imperfections in a photo and clone parts of the image. There are free and paid versions.
- SnapSeed. A huge number of filters and effects, such as tilt-shift and focus adjustment, sharpness and color adjustment. Distributed free of charge.
- Pixlr Express. Big choice filters, frames, effects. Completely free.
- Photoshop Express. It doesn’t provide any special settings, but it does have a lot of different filters that make the processing process as fast as possible. Can work with RAW files. Free of charge.
- Rookie. There are both free and paid features. The standard application package contains many vintage filters adapted for different genres of photography: portraits, landscapes, city sketches, macro, etc.
- Phonto. Allows you to add any fonts you wish to your photo. Distributed free of charge.
- Moldiv. A free application in Russian that allows you to make collages by combining up to 9 pictures.
- MultiExpo(for iOS). An interesting application for creating a multiple exposure effect. Distributed free of charge.
- Photo Grid. Free application for creating collages. Can work with high resolution files.
- LensLight. The application allows you to add glare, glow and bokeh effects to your photos. Costs 99 rubles.
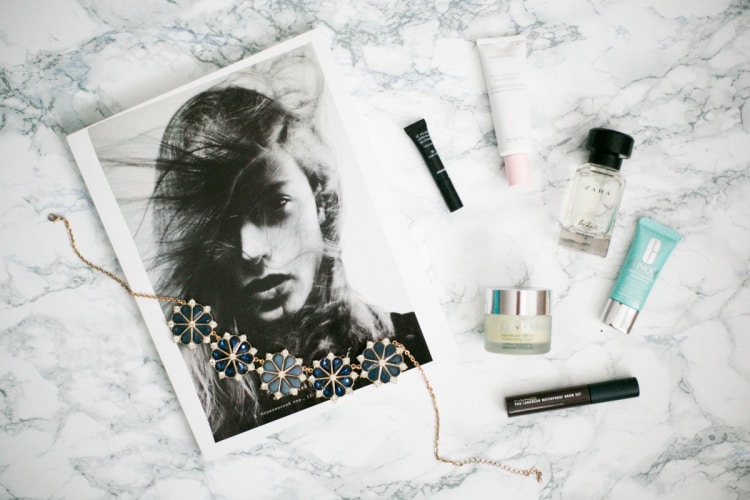
If you are interested in product or food photography, or like to shoot still lifes, then you know that one of the components nice photo- suitable background. By repeating from shot to shot, the background can become part of the photographer's recognizable style.
For photography, both light and uniform surfaces and textured ones are used: vintage wooden tables, various fabrics, as well as surfaces made of real or artificial marble, brick and even asphalt are used.
How to find a good background? It’s good if you already have a “textured” table in your apartment or studio (however, it’s still not very easy or pleasant to wipe off the consequences of a busy food shoot). Photographers often use real or specially made pieces of various materials, but all this wealth needs to be stored somewhere and is very inconvenient to transport.
Read the instructions on how to make a photo backdrop with your own hands at minimal cost. Such backgrounds are almost weightless, easy to move and (most importantly) very easy to clean.
Method 1. Photo printing on foam board
Printing on foam board is widely used in photography. Such prints are often hung on the wall - they are inexpensive, yet bright, light and durable. What if we use this technology for our task?

1. Find the source. There are no restrictions on what kind of image you can use for printing: a plaster wall, old wallpaper, painted old shabby chic boards, a brick wall, marble... You just need to take a photo of the surface you like or find it on one of the stock sites. Make sure the image resolution is at least 250-300 dpi.
2. Where to print. You can easily find a photo center, darkroom or printing company that offers printing services on foam board - choose the one that suits the price.
3. Select options. The thickness of the foam board must be at least 5 mm. Choose a matte print (a glossy surface will give unnecessary glare and reflections, which is not at all suitable for our purpose). Choose the appropriate size according to your taste. From experience, a size of 50x70 cm is well suited as a surface for laying out objects, and 100x120 cm can be used as a backdrop (wall).
4. Evaluate the result. Photo backdrops made in this way most often turn out really successful. Still, some prints may look unnatural. Don't be upset - just turn them over to the other side. Since the reverse is white, they can be used very effectively as reflectors. Another option is to imitate the surface of a window sill. Perfect if yours is not white enough, is still stone (hello, USSR) or is simply always filled with very necessary things.
So, it's worth a try. Be prepared that not all prints will turn out perfect, but if you do, you'll get a durable, feather-light, and easy-to-use photo backdrop.

Method 2. Vinyl wallpaper/backgrounds
They are available in all possible colors and textures, from wood to granite - you just need to look hard in the wallpaper section of the building supermarket. The print is made on a vinyl sheet that can be easily rolled up and placed in a corner/carried away. Of course, before using such wallpaper as a background for photography, the edges need to be pressed with something, or even better, glued so that the roll does not curl.

You can also buy special vinyl photo backdrops. Companies like Swankyprints ship them all over the world. But be prepared for the fact that the quality may vary. Some have flawless printing, others not so much, and you will only find out which one you got once you unpack your parcel. And the delivery price is steep, it’s better to order several at once. In Russia there are also online stores of vinyl photophones. It may be easier and cheaper to choose their products.
Method 3. Self-adhesive film
If you are not too lazy to work with your hands, then you can create a stylish background for literally pennies. You will need the same foam board and self-adhesive film. The film is sold in construction supermarkets (here is an example of a “marble” coating for 127 rubles), and foam board is sold in stores for artists (it costs 204 rubles).
Materials:
- self-adhesive film;
- bookbinding cardboard;
- dry clean rag;
- ruler;
- pencil;
- stationery knife.
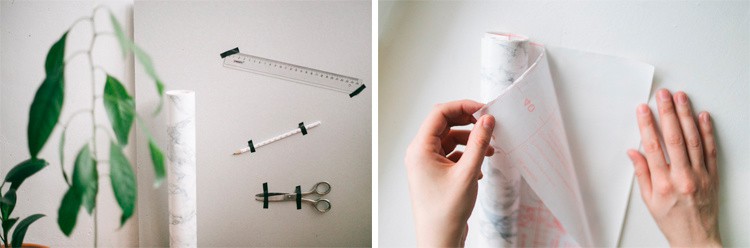
Step 1. Draw a shape of the required size on cardboard. Draw a shape of the same size on the film. Using a utility knife, cut out the shapes using a ruler.
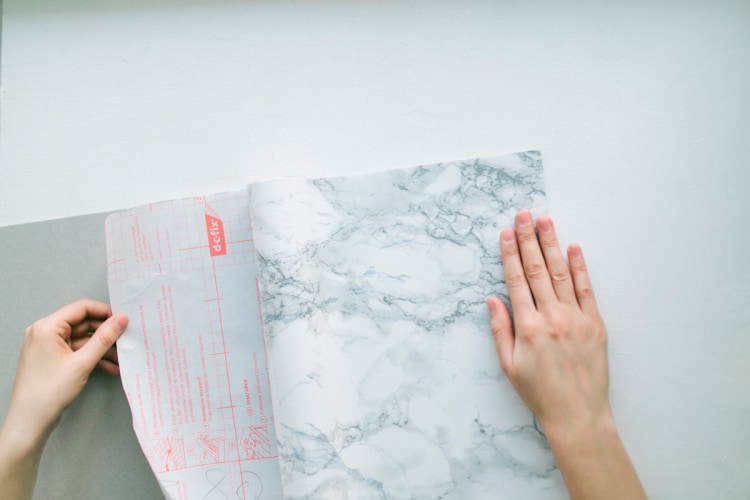
Step 2. Separate the protective film layer from the paper. Carefully apply the decorative pattern of the film with the adhesive side to the base and press with your palm. With one hand, continue to remove the paper from the film, and with the other hand, smooth the design using a clean, dry rag.
Step 3. After gluing, check whether bubbles have formed on the surface. If the film is glued unevenly or wrinkles appear, it can be quickly re-glued. But after an hour it will be impossible to separate the film from the base.
That's all
The stylish surface is ready for your photo experiments. Share in the comments which method you liked best or suggest your own option.
Right now!
Recently we had a joke at home: if something rustles in the corner of the room, it’s Inna making a photo backdrop. I never thought that working with wood and paint could be so captivating, but it is.
I am a photographer and I have a huge interest in product photography. For the time being, I huddled with various beautiful things, photographing them on the windowsill, but I realized that I wanted something better, more beautiful, more interesting. In a word, I was ripe for this useful contraption to appear in my photographic household - a wooden photophone.
Of course, it would be easier to find people who make them professionally, dial a number, place an order, and the next day or two or three days later enjoy a brand new photophone and beautiful pictures. But I decided that it would be much better and more interesting to think through what it should look like, find suitable materials, re-read articles on manufacturing instructions on the Internet and create a useful thing that will meet all my needs.
I want to describe the whole process step by step, so that everyone who, following my example, decides to undertake this exciting creativity, has in their hands ready-made instructions that would take into account all, even the most insignificant nuances. Well, as they say, let's go!
Step one.
The main reason why  oh, I wanted to get a photophone - I love kinfolk photos. These are beautiful cozy still lifes of food and other small things on a table with a rough wooden texture. I'm just in awe of wood, of the beautiful design of wooden boards with chips, scuffs, and play of colors. Obviously, the first step was to find suitable wood. And so in the evening after work we went to a large hardware store. Oh, what started here! I rushed between thin wooden slats with grooves (the ones called lining), rough and chic floor boards. When there is so much, it is very difficult to make a choice. Then I decided that the photophone, first of all, should be convenient. This time. I'm not a mechanic, not a carpenter, and it will be difficult for me to drive nails, saw, plan - that's two. Having almost bought two large floor boards, two meters long, we wandered into the section with furniture panels. Eureka! This is what you need.
The texture of the wood is wonderful, nothing needs to be knocked down, the shield is thin enough and will be easy to carry. Ready-made boards in the store are presented in sizes 60 by 80 cm. The standard, most convenient size for a photophone is 60 by 60 cm. I had to ask to cut off an unnecessary piece of wood, which, by the way, you can also use wonderfully as a mini-photophone for photography.

Having received the coveted wooden shield, I proceeded to the paints and stains department. I’ll say right away that I was a little mistaken here. I was afraid to buy a stain that was too dark and chose the “pine” shade. As a result, after coating it turned out something yellow and indistinct. Advice - buy stain in dark shades. Let it be walnut, rosewood. I chose rosewood with a cooler, non-red tone and I was right. It turned out very beautiful. The cost of stain is from 26 to 41 rubles. One bottle is enough for about twenty photophones.
I wanted to make the other side of the background lighter, more interesting, and contrasting. I love turquoise. I really love the vintage worn effect. It turns out that this is not difficult to achieve. We buy white acrylic paint in a can. I can’t tell you the cost, I had a similar one in stock at home. The most common enamel turquoise color, price – 169 rubles.
Don't forget to buy coarse sandpaper. The first time I took sandpaper in the form of a sponge. It doesn't fit, it crumbles and doesn't rub over anything. Buy regular construction sandpaper. It's also worth buying a brush. I bought two - one for stain, one for paint. You won't need anything else. Maybe gloves for painting, but that's at your discretion.
Options:
- If it still doesn’t suit you  If you want a solid piece of wood and really want a photo backdrop made from separate boards, you can buy two floor boards, the thinnest boards two meters long, and immediately in the store ask them to cut them into six identical boards 60 cm long (they do this for free).
You don't have to hammer them into a shield. It is enough to simply paint, stain and assemble the shield from individual elements for photography. Such a photophone, by the way, is convenient to carry.
— Another simplified option for creating a photo backdrop is to buy thick cardboard big size, self-adhesive film with marble effect. This background can be created in a matter of minutes.
Step two.
Photos at home  n need to be carefully wiped from dust. Some people advise degreasing it by wiping it with a cloth soaked in bleach. I didn’t bother and just wiped it very carefully with a dry cloth. Next, we begin to sand our photophone with sandpaper. It will be more pleasant for you when the edge of the background is smooth and fits comfortably in your hand. Therefore, we carefully smooth out all the uneven edges, remove burrs and grooves. After the photophone has become smooth and pleasant to the touch, we again carefully wipe it from sawdust and dust. You can use a vacuum cleaner to remove the smallest wood shavings. Only after this we start painting.
I decided to do the side with the stain first. It is not necessary to paint evenly. On the contrary, try to leave dark spots, and cover places where the wood is more textured more thoroughly. It takes about fifteen minutes to paint, no more.

The tree will change before your eyes, beautiful texture bends, chips, and notches will begin to appear. I covered the background with one coat of stain and decided that would be enough. Already in the photo I realized that the background was too faded and not interesting. Therefore, after drying, I went through the stain again. The paint also dries very quickly. 20-30 minutes, and you can continue to work. Now we arm ourselves with sandpaper and carefully rub the background along the wood fibers. It will immediately sparkle with new colors.
Texture der  Eva will become even more visible. Don't be afraid to mess up and scrub the background too much. The stain is absorbed perfectly. Where the wood is more textured, on the contrary, it is worth rubbing harder. This will give us the vintage effect we want.
The next day I began the more difficult part of the work. I painted the other side with a solid layer of white. acrylic paint. Here you need to be patient and let the photophone dry thoroughly. My paint dried all night and only in the morning I was able to start the second layer - turquoise painting. The main rule is not to try to paint everything with one continuous layer. Let the strokes be light, slightly careless. Turn on your imagination and create. Our goal is a vintage, slightly careless effect with white gaps.
The second layer should also be allowed to dry thoroughly. Accordingly, you will only be able to work with the background the next day. When the paint has set well, take our favorite “sandpaper” and sand the surface again. This time without fanaticism. Gently wipe only along wood fibers. (!) Do not make circular movements with the sandpaper, this will create unsightly scratches. Gently wipe the areas that you have painted too intensely, and more carefully the protrusions of white paint. Now our photo backdrop looks like an old wooden door covered with different layers of paint. This is what we tried to achieve. Hooray! Our photophone is ready!

Options:
The side of the photophone covered with stain can be painted over with matte varnish. This way the wood will be better preserved; stains from water and other liquids will not be noticeable if you accidentally spill them on the photo background.
Step three.
I want a conversation  talk about the creative use of the photophone and my photographic observations. First, after taking a series of pictures with a camera and a phone, I realized that photos taken with a phone turn out more impressive. A DSLR camera with a fast lens, even with a maximally closed aperture, does not convey the wooden structure of the background well enough. Perhaps this is my subjective observation. But if you have an idea to shoot a photo background only with a camera, you should take care of good natural lighting. Shoot with the aperture as low as possible and the ISO as low as possible. Most reliable way– shoot on the street or move the photophone as close as possible to a window or another light source.
An interesting observation - depending on the lighting, you can get different shades of the color of the photo background - from soft turquoise to dark blue. The side covered with stain shows itself in the same way. Conclusion - look for the light that best suits your idea.
Why not have a photo shoot at home instead of going to a studio? You will have the opportunity to personalize the shooting individual characteristics and save a lot of money. With a camera, a window, and a few assistants nearby, anyone can create a series of professional-looking photographs right in the comfort of their own home.
Steps
Part 1
Preparation- Plan to start your shoot at a time when there will be plenty of sunlight coming through the windows. This way you won't have to rush through your photo shoot.
- If there is bright light coming into your room sunlight, diffuse it with a sheer white curtain or thin white sheet. This will create a softening effect and remove harsh shadows.
- Even on cloudy days, the sun can provide enough light for your photo shoot.
-
Find lamps with “deaf” shades. Table lamps, for example, often have shades like this, closed on one side, so you can focus their light to a specific location.
- You may also consider purchasing studio lighting fixtures that are used by artists and photographers for this specific purpose. Among them are inexpensive ones that can be found in lighting stores or photo stores. If you are going to do more than one home photo shoot, this will be a profitable investment.
-
Create a professional atmosphere. Use your lighting to fill the room with soft light, without the presence of shadows.
- One light should be directed towards the ceiling, creating a soft glow over the white paint. This light should softly illuminate your subject from above.
- Use another lamp to “fill” the space with light; Place it at the back of the room, far enough away from the subject that it won't create a shadow.
- Both of these types of lighting can be used in combination with diffused natural light. Various sources lights will help create the optimal setting for a professional-looking photo shoot.
- Do not use lighting coming from above, from the ceiling; it will produce harsh shadows cast by your subject.
- You can use an umbrella, piece of cloth, or other material to diffuse or filter your light.
-
Prepare the necessary props. Perhaps a simple wooden stool will suffice for your model to pose for - or perhaps you want to do a photo shoot with a fun theme. Gather all the items you'll need and arrange them tastefully against your white pre-made background.
Choose a location for your "studio". Find a white wall, preferably in a room that receives plenty of daylight. If you don't have a white wall, or your wall is obscured by any images, hang a white sheet from the ceiling and tape it along the floor. This will create a sort of studio backdrop for your photo shoot.
Open the curtains and let the sunlight fill the room. Lighting is the most important element when conducting a high-quality photo shoot, and natural lighting helps to get the best results.