In any, even in a large, even a small team, in a student group, in a school class, in a word, wherever people live or work, in addition to names and surnames, for some reason they assign nicknames to each other. Whether it's because it's shorter, or it's more fun, I don't know. In our village, many also have such nicknames.
I won’t write about other people’s nicknames here, but I’ll speak for myself - here, behind my back, they call me TV SATELLITE. It's because I repair TVs and stuff. household appliances, as well as very often I install and configure satellite dishes.
Here's how to quickly and correctly set up any satellite dish at minimal cost, I'll tell you using the Tricolor satellite as an example.
First, some economics.
When buying a set of satellite equipment, the seller will definitely offer you the services of specialists (usually his friends) to install it, because the vast majority of buyers do not know how to install satellite dishes.
At the cost of equipment sets, for example, 9..10 thousand rubles (Tricolor), or 5 ... 8 thousand rubles. (Telecard), the cost of installation services in our area ranges from 1.5 thousand rubles to 2.5 thousand rubles, depending on the complexity of the installation work. Not 15 kopecks, however.
And in order to install an antenna in a rural area, you will also have to pay for the master’s travel there and back, at the rate of about 7 ... 8 rubles. per kilometer, because he will not go to you by bus, but with his tool and devices in his car. And then the cost of installing a satellite dish increases significantly.
That's why they turn to me, because I do it cheaper, and I don't take money for the road ...
For self-installation of a satellite dish, you will need the following.
1. A set of satellite equipment (dish, receiver, converter, antenna wire)
2. Antenna tuner Sat Finder (any make and model)
3. Adapters, F-connectors in the amount of 2 pcs.
4. Three self-tightening anchor bolts M6 X 120..150 mm, if the walls of the house are stone
5. Three large bolts - wood screws M6 X 150 ... 200 mm, if the walls are wooden
6. Perforator if the walls are stone
7. Wrenches or adjustable wrenches, 10, 13, 14, 17 (depending on the bolts)
8. Compass.
9. A piece of antenna wire 1.5..2 meters


And now, as expected, a little theory. To understand what needs to be done and why.
There are many satellites in the sky (or rather, in space). They hang there motionless, in geostationary orbit, rotating with the earth, at a distance of about 36,000 km, and of course, they are not visible. Each satellite is located in its own point of space assigned only to it. The location of each satellite is precisely known, it is immutable, and very accurately maintained. In order to understand how and where the satellites are located, imagine ... a rainbow. The satellites above the horizon are located in approximately the same arc, from its left edge to the right. Depending on where our big country You live, you can "see" with your antennas a little more or a little less different satellites.

Each satellite has its own name, like a name. For example, the Tricolor satellite, to which we will tune our antenna, used to be called Evtelsat W4 36E, now it is called Express AMU-1 - 36E. And Tricolor is just the trade name of the organization that transmits the signal through this satellite. Telecard (Continent TV), for example, has another satellite, Intelsat15 85E.
In addition, the name of the satellite usually contains a number, for example, 36E, 85E, 90E, 5W, 9W, which indicates the longitude over which it hangs, that is, the approximate direction to this satellite on the horizon.
But in our case, the sun and a compass will be used to determine the direction to the satellite.
First of all, before installing the antenna, you need to decide on which side of the house it should be placed. For the area in which I live (Bashkortostan, 56 degrees east longitude) and the Tricolor satellite, this will be the south side, approximately the place from which the sun is clearly visible from 12 to 14 o'clock in the afternoon. There should be no interference in the form of trees, roofs, and high-voltage power lines between you and the sun (satellite). The height of the antenna installation on the wall does not matter, mount it where it will be more convenient for you to adjust it, only so that the antenna does not interfere with the passage or passage. For example, I have one of the antennas right on the ground, on an iron stand. I do not advise you to put an antenna on the roof, then you will be tormented by climbing if something happens to it. Naturally, a dish should not be fixed under the edge of the roof either, so that rain, snow and ice subsequently do not fall on the antenna. It should be possible to rotate the antenna when tuning to the left and right as wide as possible.
Here is an example of what it looks like.


Now about the plate. In fact, it is not quite a plate; rather, it is part of it, slightly compressed from the sides and elongated. Such a dish has an egg-shaped shape and is called offset, it works like a curved mirror, not only collecting, but also REFLECTING radio waves from the satellite to the receiving converter.
Therefore, the procedure for adjusting the position of the dish is approximately the same as if you came to the shooting range and began to aim at the target, standing with your back to it, through the mirror.

Before the actual dish, with the receiving converter, is attached to the wall of the house, you need to more accurately determine the direction to the satellite. While it will be approximately, according to the compass. Once again, for my area it will be an azimuth of 204 degrees. Let me remind you, if anyone does not remember: in order to take the azimuth, you need to set the compass so that its arrow points to the north, and below it is the zero mark of its scale. Without moving the compass, find 204 degrees on the scale and note this direction on the ground. Let it be a direction to some tree, building, bush, stone, or whatever you have.


High accuracy is not required here, everything is about. After that, stand at the place of the future installation of the antenna and look carefully in this direction at the sky, at an angle to the horizon of about 20 ... 25 degrees. The Tricolor satellite is somewhere out there. There should be no obstacles in this direction in the form of roofs, trees, branches, poles, power lines. Here somewhere here and fasten your plate.
If the wall of the house is wooden, then the process of attaching the plate should be taken with special care, making sure that the screws get into the supporting structure of the house, into the timber, into the log or into the partition. If you simply screw the plate onto the boards or on the crate, then with a difference in humidity (summer - autumn - winter - spring), the tree will swell a little or shrink a little, the plate will move, the signal will disappear. This has happened many times in my practice.
Setting accuracy satellite dish It greatly affects the quality of reception, the permissible vibration or error here is no more than 3 (three!) Millimeters.
After the plate is fixed, first set the position of the mirror strictly vertically, according to the level or plumb, and then tilt it back a little by 1.5..2 centimeters. Do not overtighten the bolts on the plate mount.
Here in this photo you can clearly see how much you need to deflect the plate.

Connect the receiver to the TV as directed in its instructions. Turn it on. The receiver will enter channel search mode. Do not press anything, leave it as it is. Connect the antenna wire from the dish to the receiver. Then, on the street, connect the wire coming from the receiver using F-connectors to the Sat Finder device, connect the other wire, pre-prepared, short, to the converter on the plate. An approximate view of the wire cutting in the figure.
If there are no breaks and short circuits in the wiring, then the backlight of the scale will light up in it. This means that food is being delivered to the plate. By turning the sensitivity control of the device, make the device start to crackle a little from interference (but not squeak).

A little about the Sat Finder device.
Don't think of it as advertising. His name is SF-9501, sold in almost all electronic stores, or in extreme cases, on Alibaba.com. An indispensable thing when setting up any satellite dish. With a relatively low cost (400 ... 600 rubles), it saves a huge amount of time and nerves.

The principle of operation of this device is based on measuring the signal strength at the output of the converter and its sound and pointer indication.
There are various models and modifications, with displays, programmable, etc., but in our case the simplest model will be more than enough.
Now that all the connections have been checked and you can hear the noise crackling in the device, start slowly, very slowly moving the plate horizontally to the left and then to the right. As the dish moves, you will hear several different signals from various satellites (there are many of them). Your task is to choose the strongest of them and leave the plate in this position.

Then reduce the sensitivity (buzzer volume) of the Sat Finder with the regulator and select more accurately the position of the plate in the horizontal plane.

If the signals are weak or not audible at all, tilt the dish back a little (by 1 cm) and repeat the signal search in the horizontal plane again. Thus, by searching horizontally and raising the dish slightly above the horizon with each pass, you will find the satellite with the strongest signal. After such a signal is found, try a little (by a centimeter, no more) to move the plate up or down, achieving maximum strength signal. If necessary, reduce the sensitivity of the device for more precise adjustment.

Check the approximate direction of the dish to the satellite, it should not differ from the one previously found by the compass by more than 5 ... 8 degrees in one direction or another.
Return to TV. According to the instructions for the receiver, conduct an initial search for channels. Operator - Tricolor, region - Chelyabinsk or Ural. If the dish is set up correctly, then you will see a list of many channels. Check if there are Tricolor - Info and Tricolor - Promo, TV-TV, TV2-TV channels among them. These channels should work even without activating the access card.
After all the channels are found, return to the dish and carefully, so as not to knock down the setting, fix all the fastenings of the dish and all the bolts with nuts with the keys, controlling the signal strength on the device.
After fixing the antenna and checking the image on the TV, turn off the device, and connect the wire from the receiver to the converter on the plate. This completes the setup. About ten free channels and about 300 paid channels will be available to you from the Tricolor satellite. Now you should register your equipment with the operator by calling the special number indicated in the instructions for the receiver. After registering the equipment, all channels found during setup will become available for viewing.
I think that viewing will be much more pleasant, given that the entire budget of our enterprise (with nails and electrical tape) is at the level of 700 ... 800 rubles.
As practice has shown, the Sat Finder device will come in handy more than once. Whether the wind is strong, or snow with ice, or some kind of restructuring in the house, you can always go and adjust the shifted antenna, both at home and at your neighbor.
Yes, just in case, I will give the parameters for the Intelsat 15 85E satellite, for the Telecard. The azimuth is 143 degrees, the angle of elevation, that is, the "collapse" of the dish, is the same as that of the Tricolor. The rest of the setup procedure is exactly the same.
Happy viewing!
The article covers the issues of assembling, configuring and adjusting the Tricolor antenna with your own hands.
Having bought a Tricolor antenna, everyone can do their own tuning, subject to certain rules.
Set for installation of satellite TV Tricolor.
For work you will need:

To fix the base, you need to select fasteners. It should be fixed on a wooden surface with the help of plumbing "grouse". In other situations, 10x100 anchor bolts will do.
The cable used to connect the antenna and the TV must contain a thick copper core and a double braid. The cable length is not more than 100 m. If it is required to lay more than this length, signal amplifiers are additionally located.
Choosing a place to install the antenna
Since the dish receives a signal from the satellite, the main criteria for choosing a place are:

Following the criteria will ensure the elimination of errors in independent work.
Antenna assembly
The assembly instructions are attached to the equipment, following which you can complete everything quickly. The design for receiving a signal is formed by the elements:

Assembly diagram:

Assembly work completed.
Antenna adjustment
Adjustment should be carried out in good weather (no snowfall, rain, dense clouds). The stage involves the creation of a certain position of the equipment for the clarity of the broadcast. They depend on the elevation angle and the azimuth angle. To calculate the elevation angle, you should draw a horizontal line from the installed dish in the direction of the satellite and measure the angle formed by this line and the signal receiving line ( vertical angle formed when the mirror is rotated up and down).
Azimuth is the angle of the horizontal plane between the north guide line and the dish-to-satellite guide line (horizontal angle corresponding to left-right rotation of the dish).
There is a table that shows the angle of elevation and azimuth for different cities. If the plate is not installed in the city, then you need to focus on the nearby city.

The azimuth angle is set by the compass. To determine the elevation angle, you can use a protractor and a plumb line. The plumb line is located at the zero point of the protractor and serves as a conditional horizon line. The required size of the angle is plotted on the protractor scale.
Different manufacturers design the antenna at different tilt angles. Supral's products are characterized by an accurate vertical position of the antenna at an angle of 26.5°. When the equipment is located with such an angle in Moscow or Kaliningrad, it is not required to change the elevation angle. For other cities, it will be necessary to tilt the structure forward or backward so that the angle matches the required value.
TV jack installation
The TV connector is connected to the converter in accordance with the diagram:

With regard to the antenna wire used, there are two ways to install the receiver to the TV:
- High-frequency antenna cable (HF) - plugs into the antenna socket on the TV and into the inlet of the RF Out receiver. After switching on, the combination “BOOT” and the channel number appear on the TV screen. When the channel search function is turned on, the notification "No signal" is displayed, which implies the normal functioning of the receiver.
- Low-frequency cable with a connector (LF) - similar to HF. When connected, the inscription “BOOT” appears on the TV screen. After that, you need to press the “A / B” button on the console surface of the receiver. As a result, the notification "No signal" should light up. The appearance of other information indicates the incorrect assembly of the equipment.
After the above steps, you can start setting up channels.
Adjusting the signal strength of the TV show
The adjustment must be carried out by changing the position of the antenna and monitoring the signal level on the television screen. First, open the Antenna Installation menu:

After displaying two scales “Signal” and “Quality”, the equipment location should be adjusted:

Look at the TV, analyzing the content of the scales:

Pre-setting ends with fine tuning, when when the plate is changed left-right and up-down, both scales are filled at the level of 80%. Such values will help to transmit an accurate signal in bad weather (rain, snowfall, cloudiness).
After fine-tuning the TV display, you should firmly fix the equipment on the street and exit the installation menu by pressing “Exit” twice on the remote control.
Receiver Registration
The reception of a television picture occurs after the registration of the equipment. Registration is carried out in one of the following ways:
- On the Tricolor website;
- At the sales office or authorized center (usually after the purchase at specialized points of sale, the receiver is registered);
- Through the technical support department, when you have a subscription agreement on hand.
When registering, the user must specify the receiver model, a unique identification number (ID), personal data. You can see the model name on the front panel of the equipment.
The identification number is a sequence of 10-12 digits. The number is on the package sticker or on the receiver body sticker. On some packages and cases there is no inscription, so you need to go to the receiver menu. When clicking on the "Status" submenu, the user will see the ID.
To conclude an agreement, it is required to provide the user's personal data (full name, passport, date of birth, installation location, contact information).
Registration actions end with confirmation of the equipment by telephone conversation with the Tricolor service. You should indicate the purpose of the appeal, full name, identification number.
Questions from subscribers
“Do I need a special device to tune satellite dishes?”
Device for self setting not required, but it can make it easier to find a satellite signal.
"What parameters to use to set up a satellite dish?"
Azimuth and elevation.
Tricolor TV, like modern satellite TV, can be set up without the help of a specialist, saving a decent amount of money on this. The front of the work is very laborious, but simple, if you know the sequence of actions. Below will be described in detail how to set up Tricolor TV.
What will be needed at work
Before answering main question how to set up a satellite dish, you will need to prepare the following working tools:
- spanners different sizes;
- perforator;
- screwdrivers of different sizes;
- elements for fasteners;
- insulating tape;
- working level;
- drawing pencil or pen.
Selecting an antenna installation site
Setting up the Tricolor TV antenna begins with the choice of its future installation. The main factor that you should rely on when choosing is the free access of the device towards the satellite, that is, the signal source. In other words, if you visually draw a straight line between the satellite and the antenna, you should not find an obstacle on it in the form of trees and structures on roofs or buildings. This will be the first step on the way to how to set up the Tricolor satellite dish yourself.
Please note that the closer the dish is placed to your TV, the best quality signal you can be guaranteed. In addition, this way you can set up a plate much easier and faster.
Places unfavorable for antenna installation:
- glazed balconies;
- areas that may be subject to precipitation in the form of snow or rain;
- roofs with a gable, four-pitched or asymmetrical roof;
- places near a drain.
Assembling the Tricolor TV antenna and installing its main elements
Contrary to popular belief, it is not so difficult to assemble and set up an antenna and a dish. To do this, you need to follow the established algorithm of actions and rely on the proposed scheme.
- The massive bracket, which is included in the Tricolor package, should be securely fixed to the wall. The installation feature and the choice of fixing tools will depend on the wall (bearing or capital).
- When fixing the bracket, keep in mind that the converter located in the holder must be installed downwards with it. So, you will protect your Tricolor plate from precipitation.
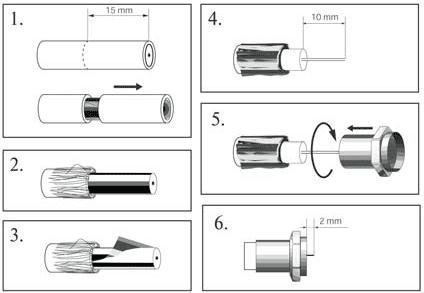
- Securely connect the cable and the converter with the F-connector. To do this, you will need to release the cable from the top insulation by no more than 10 mm. Then, tightly wrap the cable with braided shield and foil. The inner insulating layer must also be removed by 10 mm and the connector screwed in as much as possible.
- Prepare stitches and electrical tape in advance in order to install the cable in the bow of the converter holder.
- Sealing - necessary procedure, which should extend over the entire length of the cable. AT individual cases you may need silicone sealant.
- Next, fix the antenna to the bracket. Install it so that at any time you can rotate it in different directions.
- At the last stage of assembly, you will again need electrical tape and ties, since in addition to the antenna, the cable must also be fixed on the bracket. If you fasten the cable with a small margin, then this will subsequently make it easier for you to install and repair the device, if necessary.
If you are still wondering how to set up a Tricolor TV antenna without the help of a specialist, then keep in mind that you have already overcome the first and most difficult stage. And as you can see, it was not so difficult to do it. In addition, the procedure for assembling the antenna is universal and does not depend on what you use and what image format will be displayed on the screen, in particular, the Ultra HD format.
TV jack installation
Based on the presented diagram, proceed progressively:
- for fear of damaging the shielding braid, strip the cable from the top insulation by 15 mm;
- the shielding braid, and after that, the foil must be located along the entire length of the cable;
- strip the cable also of 10 mm of the inner insulation layer;
- screw in the connector as much as possible and disconnect the conductor with wire cutters, which should not protrude beyond the edges by no more than 3 mm.
The video transmitted to the TV using the installed Tricolor plate will directly depend on the quality of your work. Therefore, carefully follow the order of the instructions and make maximum efforts to the process. Setting up Tricolor TV requires progressive action.
Tricolor TV antenna adjustment
The more accurate with geographic point the antenna is adjusted, the better the channels will be shown on Tricolor TV. The peculiarity of these manipulations also depends on two factors: elevation and azimuth. Both quantities are measured in degrees.
The difficulty is that for each individual settlement and region, the indicators can vary significantly. For example, for Bryansk, the elevation angle will be 29 degrees, and the azimuth - 178 degrees. Take this feature into account when adjusting the antenna.
If, for one reason or another, channels have disappeared for you, then perhaps the cause of the failure is precisely the incorrect adjustment of the plate.
You can also determine the azimuth yourself if you know how to use a compass and determine its exact indicators.
Based on the advice provided by the satellite television provider with a high-quality Ultra HD image, connect the cable from the converter to the signal receiver. It will be very easy to do this, since the installation of the television connector has already been completed for you. After that, connect the receiver to the TV and check the signal and its quality.
Setting the signal "Tricolor TV"
In order to set up free Tricolor TV channels and their signal, you will need to go to the Antenna Settings menu. Next, move the antenna cursor in the plane until you get a signal that satisfies you.

There should be no interference, ripples and small dots in addition, the sound must be of high quality and perfect.
Please note that if you lost channels during operation, then as one of the options for troubleshooting, you can go to the above menu.
The next step you will need to open the "Received signal level" tab.
- Pick up the remote control of the receiver and press the "MENU" button.
- Use the arrow buttons, find the "Settings" tab, then confirm the command by pressing "OK".
- For further installation, a password is required. At the first stage, the provider provides for the introduction of four zeros. Later, you can change it yourself.
- Next, go to the " System settings” and confirm the command again by pressing “OK”.
- Enter the Antenna Settings menu and confirm the prompt.
After you select the antenna installation mode and channel list, determine the satellite that matches your region: Eutelsat 36A or Eutelsat 36B. Find two scales in the antenna installation menu tab that characterize the signal level and its transmission to the satellite. If both of them are filled up to the 70% mark, then all your work was done correctly and the channels on Tricolor TV will be shown with high quality.
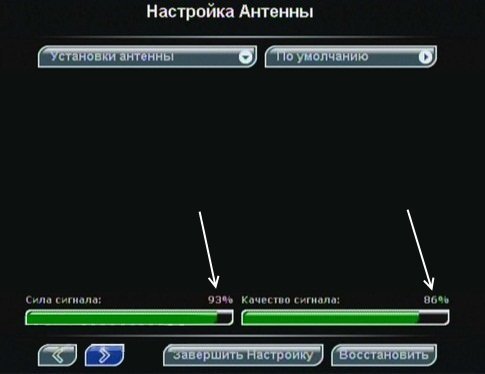
In the event that the indicators are below the desired level, it makes sense to turn to the cable connection. Perhaps he transmits a weak signal to the satellite, which simply does not pick it up.
Do not forget that your plate is still outside, it cannot be ruled out that it will be affected by weather conditions. Thunderstorm, lightning, heavy rain or any other precipitation may affect signal strength. But it will return to normal as soon as the weather improves.
Video instruction for setting up
The video clearly represents all the stages of assembly and installation of the Tricolor TV antenna. A visual demonstration allows you to more easily imagine how the work process will look externally.
Now you know how to set up Tricolor TV yourself, how to assemble an antenna, how to check the signal level and what to do if the channels are missing. This will allow you to save money that could be spent on the services of a tuner.
In contact with
One of the advantages of satellite TV is the low cost of connection. As can be seen from practice, in order to connect a satellite dish to a TV, you will have to pay about $160. Other benefits include no subscription fee(unlike cable TV), high-quality picture and sound, a large number of TV channels for every taste. So, if the satellite equipment has 3 converters (heads), then you can set up from 25 to 40 free Russian-language TV channels (depending on the satellites you have chosen).
The satellite dish is essentially a mirror that reflects the signal from the satellite. The reflected signal hits the converter, and the last one sends data to the receiver. It is from him that the television receiver receives the converted signal through the television cable.
By standard, satellites are often chosen: Sirius 5.0E, Amos 4.0W, Hotbird 13.0E, since these satellites can provide big choice broadcasts to suit any preference. But since technical progress does not stand still, then other satellites appear, providing a large selection of TV broadcasts. And you have the right to choose the one that best suits your requirements.
How to connect a TV to a satellite dish
There are 2 ways to connect a TV to a satellite dish:
- the cable connects directly to the TV receiver;
- connection is through the receiver.
Direct connection to a TV receiver
As you know, to watch satellite TV, you need a receiver. But in modern TVs they began to install digital tuners DVB-S2, which make it possible not to use an external receiver, connect a cable to the TV set directly from the “dish”, and catch TV from the satellite.
To find out if the TV supports this function, you can look at the description for the device, which can be found on various sites selling consumer electronics.
But, unfortunately, the TV will only catch free (not encrypted) foreign channels. To watch domestic TV via a satellite, you will need to buy one that connects to DVB-S2 via a PCMCIA interface.

The CAM module is purchased with a suitable satellite TV package, which you can choose from among the many operators that offer this service. The convenience of using such a connection is obvious:
- no need to purchase a separate receiver;
- You only need one remote to change channels.
Before purchasing a satellite TV package with a CAM module, ask your provider if their modules are compatible with a specific TV model.
Setting the plate
Before you start connecting the cable to a TV without a receiver, you need to assemble the entire set of satellite equipment you purchased and correctly position the antenna itself. Place for setting the plate should be such as to provide good guidance to the satellite. By the way, don't right choice places - common cause that . In addition, access to the antenna will be required for tuning. Therefore, it should be located in an accessible place. Various interferences, such as buildings, trees and various structures in the signal reception path, greatly degrade the quality of the television broadcast.
Basically, broadcasting TV satellites are concentrated in the direction from the southeast to the southwest. Satellites located in the south have highest altitude location above the horizon.
Cable preparation
When the installation of the plate is completed, you will need to prepare and . The F-connector is a simple sleeve that is screwed onto the cable, so it is important that it is threaded.


If the output on the TV or receiver is adapted for the F-connector, then it will not be difficult to connect the TV to a satellite dish. In the case when your TV set has a regular antenna output, you will need buy an adapter.


You can, of course, buy a regular antenna plug, but they are often of poor quality. In the case of an F-ki with an adapter, a universal plug is obtained that can be connected both to the F-output and to the antenna.
Before connecting the cable to the TV, do the following.

Connection and setup
To prepare for watching TV, you need to do the following:

To switch between different television signal sources, whether it is satellite TV or cable, HDMI signal or another, the INPUT button is pressed on the remote control and the desired one is selected.
Connecting via a receiver

How to properly connect a satellite antenna to the device? In modern television receivers, you can connect the cable to the TV through the receiver through the following connectors.

Thus, connecting satellite equipment to a television receiver is not a difficult matter. The main thing is the correct choice of the direction of the antenna, the connection of the equipment with cables and the adjustment of the reception of television broadcasts. Setting up a satellite receiver, on the contrary, is a complex process that requires some knowledge to carry out the calculations necessary to correctly orient the dish mirror to the satellite groups. After that, the reception itself is configured (for this you need to know the necessary parameters for input). O DIY receiver setup You can find out by watching this video.