In operating systems of the Microsoft DOS and Windows line chkdsk utility used to correct errors that have occurred on the hard drive. Its name speaks for itself - the abbreviation was obtained by shortening two words “check disk” (disk check). The program can correct errors in the file system, and starting from Windows NT, it can also find damaged sectors of the hard drive. If any are found, they will be specially marked as damaged, and their further use will be discontinued. This may help if you frequently experience the Blue Screen of Death.
Read more here - blue screen of death what to do.
Console Commands
If you run the utility chkdsk by default, a standard error check will be performed on all logical volumes hard drive. As a result, you will receive a report about the errors found or their absence, without any further action. For more fine-tuning, console commands are used. — Volume. In the event that you need to check one specific volume, you should indicate the designation with a Latin letter. —/F. By setting this parameter, errors found will be corrected whenever possible. — /R. Program chkdsk will look for bad sectors, try to fix them, or mark them as inaccessible. This parameter only works in conjunction with /F. These are the three main console commands. They are quite sufficient for diagnosing and correcting errors on the hard drive. Other parameters are used much less frequently.
Running CHKDSK
To begin with, it should be noted that if the PC is turned off incorrectly, the next time you boot, the process of checking the disk for errors will be automatically initialized. Let's look at manually starting the program chkdsk. Method 1. You should use the Windows 7 program launch console - to launch it, click Win+R. Dial service command chkdsk with all the necessary parameters, and to launch it, click OK. The same can be done in the console, having first launched it by typing in the program launch window cmd.exe. Method 2. Now we will use the properties of the local volume. Open “My Computer” and right-click on the one we want to check. Select “Properties” and go to the “Service” tab.

Now we should select the “Run check” item.

Mark the required parameters and click “Launch”. The disk check will begin. If the check is not possible while the operating system is running, the utility program chkdsk prompt you to schedule the scan to start the next time you turn on your computer. Either way, you need to know how to run the chkdsk utility. It will be useful for various tasks.
Scenario: You have system errors that need to be fixed.
The Microsoft CHKDSK (“Check Disk”) utility for checking and correcting hard disk errors was introduced more than 30 years ago, but is still used today. Even users latest versions Microsoft operating systems can use this command to check their hard drives for errors and fix them if necessary. Below are instructions for running CHKDSK on Windows 10.
If you still get errors after using CHKDSK, try .
First, select “Search Windows” and search for Command Prompt by typing “cmd”. Right-click on the shortcut and select “Run as administrator” from the context menu.

After logging in as an administrator, you will find yourself in the Windows Command Prompt, familiar to users of operating systems before Windows NT. Type the command “chkdsk”, press the spacebar and then the drive letter you want to check or fix. In our case, this is the external drive “L”.
Running the CHKDSK command without arguments will only show the status of the disk and will not fix any errors present on the partition. To ask CHKDSK to fix errors on the disk, you need to specify parameters. After entering the drive letter, enter the following parameters, each separated by a space: “/f /r /x”.

The “/f” parameter tells CHKDSK to fix any errors it finds; “/r” tells the program to detect bad sectors on the disk and restore readable information; “/x” causes the disk to be unmounted before the process begins. Additional options are available for more specialized jobs, and are detailed on the Microsoft website.
As a result, the complete command that needs to be entered into the Command Line looks like this:
chkdsk [Disk:] [options]
In our case:
chkdsk L: /f /r /x
It's worth noting that CHKDSK must lock the drive, so it will fail to check the system boot disk if the computer is running. In our case, the target disk is external, so the process will begin immediately after entering the command. If the target drive is bootable, the system will ask you if you want to run the command before the next boot. Type “yes”, restart your computer, and the command will run before the operating system boots, giving you full access to the disk.
The CHKDSK command can take a long time to complete, especially on large drives. When completed, the program will summarize the results, such as the total amount of disk space, byte placement, and most importantly, information about the errors found and corrected.
The CHKDSK command is available in all versions of Windows, so both Windows 7 and Windows XP users can follow the above steps to initiate a hard drive check. If you are using older versions of Windows, you can do the following:
- Click “Start – Run…”
- Enter cmd
- Enter chkdsk [Disk:] [options]

Stages of “CHKDSK”
The 5 main stages are described below:
Step 1: Checking the basic structure of the file system...
In the first stage, files with entries in the MFT (master file table) are compared and checked.
Stage 2. Checking file name associations...
At this stage, directories and structure are checked. They are checked to match the file size and timestamp information.
Step 3: Checking Security Descriptors...
In the last verification step (3), files and folders are checked for security descriptors, including NTFS rights owner information.
The fourth and fifth stages are executed only if the /r argument is present!
Stage 4. Search for damaged clusters in user file data...
Cluster sectors, including data, are checked for usability.
Stage 5. Search for damaged and free clusters...
At the fifth stage, the cluster sectors are checked for missing data.
If it is not possible to solve hard drive problems using “CHKDSK”, it is recommended to use the corresponding manufacturers.
Also on Windows you can access the CHKDSK GUI
To perform the test using the GUI, do the following:
Right-click on the drive you want to check. Select Properties – Tools – Run check.

This is the “CHKDSK” GUI. The two options correspond to the “/f” and “/r” parameters.
Hard disk (HDD) is the most important element of a computer on which all the necessary information, programs and user files are stored. Like any other component, over time the hard drive wears out, its normal operation is disrupted, and failures begin to occur. Along with physical wear and tear, which leads to the appearance of so-called bad sectors (bad blocks), logical errors associated with the file system, indexes and the main file table often arise.
For the time being, you may not observe any problems with your hard drive, but this does not guarantee that one day the hard drive will not die. Therefore, it is important to periodically (once or twice a year) check your hard drive for errors and bad sectors that require repair. Regular monitoring will allow you to track the condition of the media and respond in a timely manner to changes in its condition. Of course, you should not neglect such a proven method of protecting information as backup. The most valuable data must be duplicated on a backup storage device.
Symptoms of a failing hard drive
In most cases, HDDs operate uninterruptedly for several years without requiring any special attention. However, in case of improper operation (physical impact, lack of proper cooling), the resource of the storage medium is significantly reduced. In rare situations, there may be a manufacturing defect or sudden failure.
Failures in the hard drive may be indicated by loading the operating system for too long, the unreasonable disappearance of files and folders, and slow startup of applications. Obvious symptoms of a hard drive losing its functionality are slowdowns in programs and long periods of copying files. If the computer constantly freezes, and nothing other than restarting helps, then in the process of identifying the causes, checking the hard drive should be the first point.
Using standard Windows 7/10 tools
You can test the media standard means Windows. The easiest way is to select the desired hard drive in Explorer, right-click on it and go to the “Service” tab.
Next, click the “Run scan” button and set the scan parameters in the window that opens. If both checkboxes are checked, Windows will automatically correct all system errors and restore damaged sectors during diagnostics.

The results of the audit can be found in the report.

Command line
You can also audit your hard drive using the utility chkdsk called from the command line. In fact, such a check will not differ much from the above option.
So, launch the command line by selecting the required Start menu item. Then enter the command in the window: chkdsk G: /f /r
- G – name of the hard drive being tested (select the drive you will check);
- f – error checking and correction;
- r – detection and recovery of bad sectors.

All information about errors and bad sectors found will be displayed as the diagnostics are carried out.

Third-party programs for checking your hard drive
There are many programs and utilities for finding bad sectors and fixing HDD errors. We will list only the most famous ones.
Victoria
Perhaps the most popular hard drive checking tool. The program can be launched both in Windows and in DOS mode from a bootable USB flash drive.
The interface provides five tabs: Standard, SMART, Tests, Advanced and Setup. First of all, go to the section Standard, where in the list of devices we select the hard drive we are interested in. The Drive passport area will display basic information about the HDD.

Next, select the tab SMART and press the “Get SMART” button. SMART (Self-Monitoring, Analisys and Reporting Technology) is a hard drive self-monitoring technology. Those. The hard drive monitors its operation during operation, recording information on a set of parameters that allows one to assess the condition of the media. It is this service information that we are trying to obtain.
After clicking “Get SMART”, either the inscription GOOD on a green background or the inscription BAD! will appear to the right of the button. on red. The second option will indicate that the media is in unsatisfactory condition and will most likely have to be replaced. For a more detailed study of SMART statistics, let's pay attention to the list of parameters on the left. Here we are primarily interested in the attribute 5 Reallocated sector count, indicating the number of sectors remapped. If there are too many of them, then the disk has begun to “crumble,” that is, its surface is rapidly degrading and it is urgent to make a copy of all data. In this case, there is no point in restoring the hard drive.

Chapter Tests makes it possible to check the hard drive for bad sectors, as well as try to “cure” or reassign unreadable blocks. For simple testing of the hard drive, set the switch to Ignore and start the test with the Start button. Sector health is assessed by measuring response time. The smaller it is, the better. Each response time range has its own color code. The slowest blocks are marked in green, orange and red. Sectors that could not be read at all are marked in blue. In the presence of large quantity“slow” and unreadable blocks, the hard drive should be replaced.

The Victoria program allows you to restore bad sectors, but we will not consider all the nuances of the procedure. Moreover, “treatment” often contributes only to a slight extension of the service life of the storage medium. To reassign bad blocks, perform a check with the mode enabled Remap. If the restoration was successful, do not rush to rejoice. Re-diagnostics of the disk after a certain period of operation. The appearance of new bad blocks will indicate that the degradation of the hard drive is irreversible, and it’s time to find a replacement.
HDDScan
This is another one convenient program to identify problems with hard drives. After launching the application, select the drive that needs to be checked in the Select Drive list.
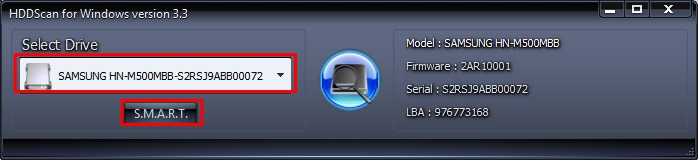
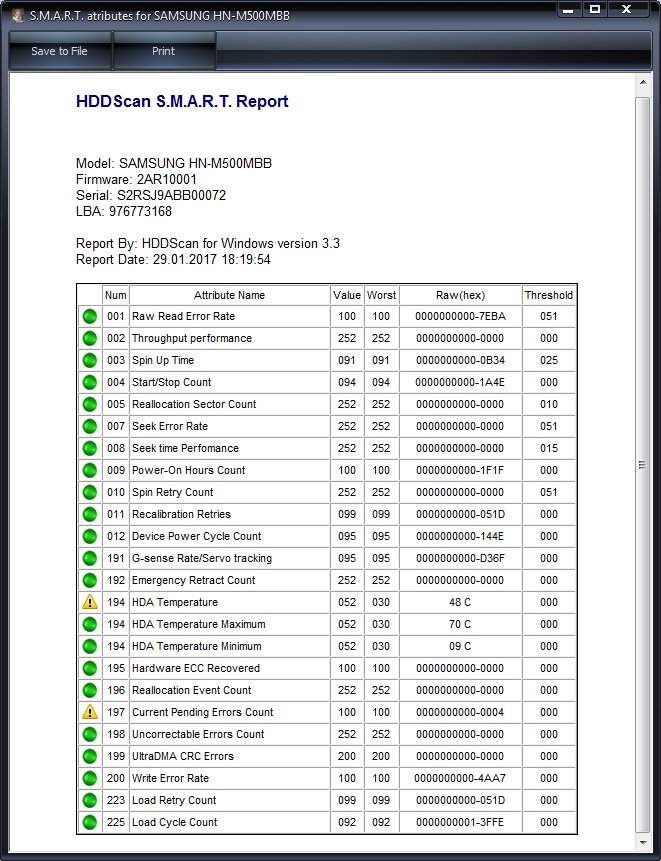
Below we click on the “S.M.A.R.T.” button and get acquainted with the provided report.
Now let's diagnose the disk surface. Click on the round button to the right of the drop-down list of media and select Surface Tests in the menu that opens.

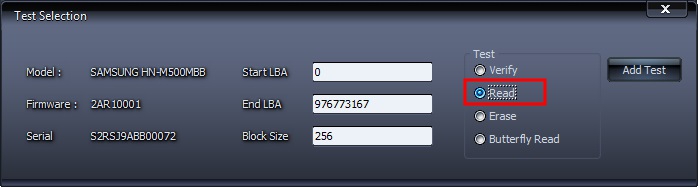
Click on the Add Test button, thereby adding a test to the list and starting its execution.
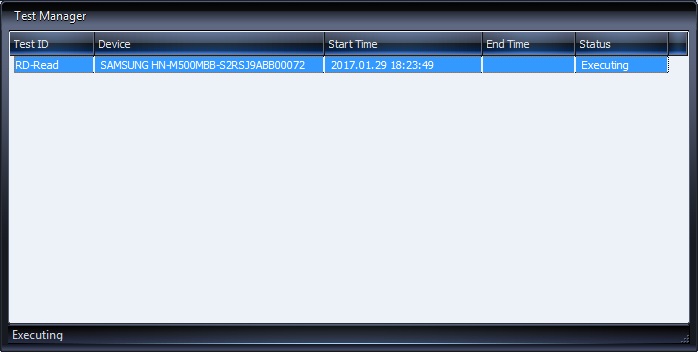
You can receive information about the progress of testing in Graph, Map, and Report modes. All blocks are also distributed into groups with corresponding color markings depending on access time.


At the end, a final report is generated.

Perhaps this is all we wanted to tell you about the methods of checking a computer’s hard drive for functionality. We hope the information provided will be useful to you and help you save important data.
Chkdsk (Chkdsk.exe) is a command line utility on Windows systems that checks disk volumes for file system problems and errors. This tool can also try to fix any errors it finds. For example, chkdsk can fix problems related to bad sectors, orphaned clusters, and orphaned files and directories. By the way, I recently wrote about the features of working with c . However, the automatic check of the file system by the chkdsk utility, when the PC is not rebooted correctly, annoys some users. And in principle, such a check can be disabled (although it is not recommended - because you lose control over the integrity of your file system).
To disable automatic disk check when Windows starts, go to the following registry key:
HKEY_LOCAL_MACHINE\SYSTEM\CurrentControlSet\Control\Session Manager
In the right pane, double-click on the key BootExecute. The default value of this key is autocheck autochk *
* means that each disk is checked for consistency (integrity, consistency). Just add the "/K:C" parameter before the *. The /K option disables automatic checking of the C: drive when Windows boots. So, the final value of the BootExecute registry key should look like this:
autocheck autochk /k:C *
If you want to disable scanning on other drives (for example, on drives C: and D:), use the following key:
autocheck autochk /k:C /k:D *
If you want to change everything back, just replace the parameter value with:
autocheck autochk *
If you do not find the specified key in the registry, you can disable disk check at boot using the utility chkntfs(key /x). To do this, open a command prompt with administrator rights and type the command:
chkntfs /x d:e:
 Then restart your PC. The specified command will exclude drives D: and E: from the automatic disk check procedure at boot. If you need to exclude other drives, simply modify the command to include the appropriate drive name.
The chkntfs /d command returns the original settings (all system disks are checked at boot, and Chkdsk is run only on disks with errors).
In any case, if you disable disk scanning at boot, you must periodically check them manually. You can check the disk status this way:

Message F: is not dirty indicates that the disk has no errors and does not need to be checked.
Almost every user has at least once encountered a message appearing on their computer asking them to run chkdsk. This is a utility program whose purpose is to check the hard drive for file system errors and then correct them. By default, this utility is installed on every Windows OS, so you do not need to search for and download it. Everything is much simpler - we will only look at how to launch it.
Launch methods
In order to open the program you will need to open the Computer. In it, click the right side of the mouse, aiming at the disk that interests us. Select Properties from the drop-down list. Next, go to the Tools tab and click Run check. After this, the chkdsk utility window opens.


Before you run the chkdsk windows 7 utility, decide what exactly you want to do with it. The interface has a choice of utility actions. You just need to mark or deselect. If you are planning to check the partition on which the operating system is installed for errors, you may encounter a situation where the computer displays a message stating that this is impossible.
This situation does not indicate any serious problems. The check will simply be done when you restart the computer. This should not happen with partitions that do not have an OS.
In some versions windows program starts automatically. This is possible in XP, NT, 2000. Usually this happens when you turn on the computer, if the work was completed incorrectly. For example, a sudden power surge, etc. In version 7 of the chkdsk operating system, only the user can start the service.
You can open the program using the command line. To do this, click Start and find Run. In the line, enter the command chkdsk d: /f, where d is the name of the disk that needs to be checked. Accordingly, if another section is needed, then we write its name.
The chkdsk program allows you to check your disk for file errors and then fix them. Its work can last from several minutes to hours. Sometimes she can be a very good helper. Of course, there are other programs that can perform similar functions, and they are often distributed free of charge. However, such utilities are usually not needed if chkdsk is installed. And it is supplied complete with all versions of the operating system windows systems.
Video to help:
userologia.ru
CHKDSK - what is it? CHKDSK utility. CHKDSK - how to run?
Nowadays, a computer is perceived as an ordinary household appliance, the presence of which in every home no longer surprises anyone. But this was not always the case. Surely most of readers will remember what a miracle it was just recently to have your own computer, which cost as much as a car.
And it doesn’t matter that its power was sometimes only enough for the most primitive toys, but you could spend hours studying its “guts” and getting acquainted with the principles of operation of the equipment. As a result, in those years there were few PC owners who did not know at least the most basic principles of caring for it.
Unfortunately, the current generation of users is often not so “savvy” in these issues, and therefore even basic problems cause them to panic. Do you know what window sometimes appears when the system starts? If you understand anything about the English dialect, then you probably noticed that you can press the “C” button to cancel some kind of disk check.
This is the CHKDSK program. What is it and what is it for?

Basic information
You have to start from afar. If you have at least a basic understanding of organizing data storage on hard drives, then you also know about the possibility of various types of errors occurring. They appear by various reasons, but the result is the same - data corruption and the need to format the media.
Of course, things don’t always come to such severe consequences, but anything can happen. It is to prevent such cases that the CHKDSK utility is needed. What is this program? Simply put, this application is responsible for checking the hard drive for logical and physical errors, as well as correcting them.
The program is included in all versions of Windows OS, and therefore there is no need to install it separately.
What is done with physically damaged sectors?
If you read carefully, you were probably surprised to see information about correcting even physical errors on the surface of hard drives. No, the program does not send nanorobots there, but it can mark “faulty” areas with a special marker.
 As a result, the OS no longer writes any information to these cells. We remind you that the SCANDISK utility was responsible for performing this work in earlier versions of the Microsoft OS.
In general, if you run the utility with the checkbox for detecting and correcting physical errors selected, be prepared to wait a long time. It is best to leave this operation overnight without touching the computer while it is being performed.
Running the scan on Windows XP/7
Let's take the simplest path first. Running the program this way is absolutely no problem. To do this, go to “My Computer”, right-click on the disk you need to check, and select “Properties” in the context menu.
A dialog box will open asking you for the Tools tab. There is an item “Check disk for errors”. Click on the appropriate button, after which the utility we need starts. Check the boxes you need, and then click on the “Launch” button.
Possible problems
Attention! It is not so rare that various kinds of difficulties arise. The peculiarity of Windows is that if the disk is used by some application, it cannot be checked. In this case, a dialog box will appear in which the user will be asked to postpone checking the disk until the next time the computer is restarted.
Remember how we talked about this at the very beginning of the article? The moment you start your computer, the CHKDSK text interface will appear. We have already found out what this is. If the disk you select is not a system one, then the check will be performed from within the Windows OS itself.
Some nuances of Windows XP
In our country, to this day, it often happens that in the midst of the working day, electrical energy in the network suddenly disappears. Computers shut down in an emergency, the file system falls into a deplorable state...
Naturally, at the next reboot the disk check program should be launched, but with the old XP this does not always go smoothly. Even if CHKDSK (we have already learned what it is) did not start automatically when the system started, it is better to force it to start.
 The fact is that errors in the file system (and they almost always appear during an emergency shutdown) can manifest themselves suddenly and completely unexpectedly. This can be expressed in inappropriate behavior of the OS, crashes and incorrect operation of applications.
Run from the command line
We have already described above the simplest way, with which you can launch such a useful utility. But we would recommend doing this in command line emulation mode. For what?
The fact is that from under the graphical shell the program can start with only two main parameters: correcting logical or physical problems of the hard drive. And in command line mode you can adjust almost dozens of parameters.
Of course, for novice users all this is unnecessary, but over time you will still come to the need to use advanced settings.
Enough words, let's get down to business. How to launch the command line? To do this, click on the “Start” button and find the “Run” item there. Click on it, after which a field for entering commands will appear in front of you. You need to insert something like this into it: chkdsk with: /f.
Detailed information on launch options
How will CHKDSK run in this case? The parameters in this case are specified by the letter “F”. It means that the utility will detect and correct only logical errors on the hard drive. If you put the /v parameter there (chkdsk with: /v), then the utility will first display all the directories that will be scanned.
 If you are interested in finding and repairing damaged hard drive sectors, put /r at the end of the command. The value of this parameter is that the utility begins not only to search for such problems, but also tries to save from faulty areas the data that can still be read.
Important!
The last operation is only possible (!) when the disk is locked. Accordingly, in normal conditions This command cannot be executed from within Windows itself. To correct this omission, compose the command as follows: chkdsk with: /x /r.
This technique can only be used (!) on disks with the NTFS file system. /x option in this case blocks the hard drive, after which the program can continue working. By the way, the same command fully uses the functionality of /f, so if it is necessary to correct the same logical errors, it should not be re-written.
It often happens that there is not enough time to carry out technological operations. Is there any way to reduce the execution time of the CHKDSK utility? The parameters allow this. Just enter this into the command line: chkdsk with: /i. In this case, the check will be performed with a less thorough check of the index entries.
Attention! This option should also only be used with NTFS file system drives. So before you run the CHKDSK utility, we strongly advise you to double-check everything.
 It must be remembered that there are many commands and conditions for their use. To fully characterize them all, the scope of this article is clearly insufficient. If you want to learn more about some parameters, use the following command: chkdsk with: /?. In this case, quite detailed help will appear on the command line.
Important Note
While reading this article, you have already come across some comments more than once. In a word, one more moral lesson definitely won’t hurt! The fact is that beginners often cannot use any command, since the OS displays messages like: “Access denied.”
What's happened? It's simple - your account does not have the necessary rights. Yes, the vast majority of domestic users constantly work under “Administrator”, but in the latest version of Windows OS (starting with Vista), there is good “fool protection”.
All actions that, even in the long term, could harm the system must be launched with built-in administrator rights. To get the “administrator” command line at your disposal, you need to perform a few simple operations.
Before you run the CHKDSK program with extended privileges, you must click on the “Start” button and write CMD in the “Search” field. A list of found files with the same name will open on the right side of the window. Right-click on the first one (as a rule, there won’t be any more), and in the context menu that opens, select “Run as administrator.”
All! After this, you can scan the disk with the keys that are necessary to perform the type of scan you need.
If the problems are more serious...
All this is good, but how to run the CHKDSK program if Windows itself refuses to start at all? Alas, in this case you will not be able to do without the original boot disk from which you installed the OS.
You insert it into the drive, reboot into the BIOS, and set it to start from a CD. After that, reboot again, wait for the first inscriptions to appear. In windows XP, to exit to the console you need to press the “R” key, and in Vista/7/8 you should select the item of the same name in the graphical menu.
When you go to the console, you will be asked to indicate the number of windows for which you would like to use the CHKDSK utility. How to run the required one? To do this, you need to enter the number under which it appears in the list provided, and then press Enter.
If your Account is protected by a password, you will need to enter it as well. All. After this you can use the CHKDSK command. How to run it with the parameters you require? It's simple. To do this, you should use the keys that we have already written about above.
Another important note
Everything would be fine, but owners of OS 2003, XP and Vista should be on their guard: Microsoft reports that the disk check utility on these systems contains a critical error. In some cases, it appears, after which a message is displayed stating that “handles are not supported” or “CHKDSK is corrupt.”
Until relatively recently, there was no solution to the problem, and therefore it was often necessary to completely reinstall the system. Currently, the support service advises using a small utility called secedit, which, even after the end of XP support, is available on the official Microsoft website.
Unfortunately, even its use does not guarantee anything. In particular, there are often problems with starting services, and the disk error checking program itself can simply crash without explanation. Sometimes running it as an administrator helps (as we already wrote about above). Most often, the CHKDSK error will continue to “delight” you until you reinstall Windows.
Keep track of installed programs!
We should not forget that not only in life, but also in your computer, everything is interconnected. On all thematic resources, users have been told many times that under no circumstances should they install applications from dubious sources, but few people pay attention to these warnings.
If, after installing a utility, a disk check (CHKDSK) starts when Windows starts, this clearly indicates that there is something wrong with this program. It is possible that her installer was written crookedly. There is also a possibility that it was simply not installed correctly.
In this case, we can recommend reinstalling the program, and to remove it it is better to use specialized utilities (Revo Uninstaller Pro, for example), which can completely remove all traces of an unsuccessful installation.

How to remove disk check from startup?
It happens that on a completely stable system, on which nothing new has been installed for a long time, a rather annoying window of this utility begins to appear every time you start it. As we have already said, there can be many reasons. It is quite possible that with the help of windows CHKDSK, a hard drive that is on the very verge of painful death is giving you desperate signals.
Be that as it may, you can remove this program from startup. Attention! You do this entirely at your own peril and risk!
First, click on the “Start” button, look for “Run” there, and then enter the Regedit command. A Registry Editor dialog box opens, in which you need to find the HKEY_LOCAL_MACHINE\SYSTEM\CurrentControlSet\Control\Session Manager key. Go to it, look for the BootExecute item, and then completely erase all its contents. Click on the "OK" button, exit the registry editor, and reboot. As a rule, extraneous windows no longer appear during startup.
That's what CHKDSK is. You also already know how to run Windows 7 without it.
fb.ru
How to run chkdsk (checkdisk) - a program for fixing disk errors
The Chkdsk (Check Disk) system program is designed to maintain hard drives, in other words, to correct errors on them. This event is necessary for the stable operation of your PC and for the safety of valuable files on the disk.
Before answering the question: “How to run chkdsk?”, Let's take a closer look at this built-in utility.
Chkdsk (Chekdisk) is a tool for correcting disk errors, which is also intended for diagnosing a hard drive (HDD) for errors in the file system.
You've probably seen it more than once when, after a sudden power outage, before windows loads, the following screen appears:

Often, some inexperienced users confuse the Chkdsk screensaver with the blue screen of death, but this is not true, although they are similar. If you see a screen like this before loading Windows, don’t be alarmed, it’s just the Chkdsk program running.
In operating systems from Windows NT to XP, this utility can also check the hard drive (HDD) for the presence of physically damaged sectors (bad sectors). Damaged sectors are marked by the system as non-working, after which data is not written to them, and therefore not read.
Chkdsk is undoubtedly a very useful program, and the file system on your hard drive would have a very hard time without it. The automatic launch of this utility may indicate not only failures in the file system, but also damage to the disk itself. So sooner or later you should think about backup copies of files that are valuable to you.
How to run Chkdsk: two ways
This program can start not only automatically, but also when normal operation your OS, you can always run Chkdsk manually to check your hard drive for errors. This is necessary when your computer starts to become unstable and a blue screen of death appears from time to time.
So, the 1st method (graphical):
Open “My Computer”, right-click on the drive you want to scan, and then select “Properties” -> “Tools” -> “Run scan”.

In the window that appears, check both checkboxes and click the “Launch” button.
Now all that remains is to wait for the verification to complete. If you want to check the system drive C: (or the one on which you have Windows installed), a message may appear that the scan will be scheduled the next time the system is rebooted. This is normal and there is nothing wrong with it.
2nd method (via command line):
This method Launching Chkdsk is needed when there are errors on the disk and file system, but the program does not start when Windows boots.
Click the Start menu -> Run (or the key combination “windows + R”). In the window that appears, enter the chkdsk command with the following parameters:
- Disk: – partition/drive letter /f – a special parameter for the program that specifies the correction of errors on the disk.
You should get the following command (in this case the C: drive is indicated, but you can choose another one, depending on what partitions your hard drive is divided into):
or something like this
The specified drive must be locked for the scan to begin, so the following message may appear:
“Chkdsk cannot check for errors because the selected disk is being used by another program. Should I check the next time the system boots? Yes/No".
Select the “Yes” option and press Enter. Now, as soon as you turn off or restart your computer, Chkdsk will begin scanning the specified disk.
It should be noted that the /f parameter is not the only one, there are others. But, as a rule, they are used quite rarely. To familiarize yourself with all the capabilities of the Chkdsk program, visit the Windows Help and Support section, because... they are secondary.
The only thing worth mentioning is the /r parameter, which can be useful. It allows you to detect bad sectors on a disk and restore that part of the information that can still be saved.
Example command with the /r parameter:
Now you know exactly how to run chkdsk. However, you should not check the disk for errors every day; it is recommended to do this only after serious failures in the system. If you spend preventive measures with your hard drive, then do this no more than once every three months.
HardwareGuide.com
[Instructions] Using CHKDSK
Scenario: You have system errors that need to be fixed.
The Microsoft CHKDSK (“Check Disk”) utility for checking and correcting hard disk errors was introduced more than 30 years ago, but is still used today. Even users of the latest versions of the Microsoft operating system can use this command to check their hard drives for errors and fix them if necessary. Below are instructions for running CHKDSK in Windows 10.
If you still experience errors after using CHKDSK, try alternative programs.

First, select “Search in windows” and search for Command Prompt by typing “cmd”. Right-click on the shortcut and select “Run as administrator” from the context menu.

After logging in as an administrator, you will find yourself in the Windows Command Prompt, familiar to users of operating systems before Windows NT. Type the command “chkdsk”, press the spacebar and then the drive letter you want to check or fix. In our case, this is the external drive “L”.
Running the CHKDSK command without arguments will only show the status of the disk and will not fix any errors present on the partition. To ask CHKDSK to fix errors on the disk, you need to specify parameters. After entering the drive letter, enter the following parameters, each separated by a space: “/f /r /x”.

The “/f” parameter tells CHKDSK to fix any errors it finds; “/r” tells the program to detect bad sectors on the disk and restore readable information; “/x” causes the disk to be unmounted before the process begins. Additional options are available for more specialized jobs, and are detailed on the Microsoft website.
As a result, the complete command that needs to be entered into the Command Line looks like this:
chkdsk [Disk:] [options]
In our case:
chkdsk L: /f /r /x
It's worth noting that CHKDSK must lock the drive, so it will fail to check the system boot disk if the computer is running. In our case, the target disk is external, so the process will begin immediately after entering the command. If the target drive is bootable, the system will ask you if you want to run the command before the next boot. Type “yes”, restart your computer, and the command will run before the operating system boots, giving you full access to the disk.
The CHKDSK command can take a long time to complete, especially on large drives. When completed, the program will summarize the results, such as the total amount of disk space, byte placement, and most importantly, information about the errors found and corrected.
The CHKDSK command is available in all versions of Windows, so both Windows 7 and Windows XP users can follow the above steps to initiate a hard drive check. In case of using old windows versions, you can do the following:
- Click “Start – Run…”
- Enter cmd
- Enter chkdsk [Disk:] [options]

Stages of “CHKDSK”
The 5 main stages are described below:
Step 1: Checking the basic structure of the file system...
In the first stage, files with entries in the MFT (master file table) are compared and checked.
Stage 2. Checking file name associations...
At this stage, directories and structure are checked. They are checked to match the file size and timestamp information.
Step 3: Checking Security Descriptors...
In the last verification step (3), files and folders are checked for security descriptors, including NTFS rights owner information.
The fourth and fifth stages are executed only if the /r argument is present!
Stage 4. Search for damaged clusters in user file data...
Cluster sectors, including data, are checked for usability.
Stage 5. Search for damaged and free clusters...
At the fifth stage, the cluster sectors are checked for missing data.
If you cannot solve problems with your hard drive using “CHKDSK”, it is recommended to use hard drive utilities from the corresponding manufacturers.
Also in windows you can access the CHKDSK GUI
To perform the test using the GUI, do the following:
Right-click on the drive you want to check. Select Properties – Tools – Run check.

This is the “CHKDSK” GUI. The two options correspond to the “/f” and “/r” parameters.
Alignment Tool, Backup & Recovery, Disk Wiper, Drive Copy, ExtFS for windows, GPT Loader, Hard Disk Manager, HFS+ for windows, Migrate OS to SSD, Partition Manager, Virtualization Manager, Products for windows, Private Tags: windows, instructions, general, problem
Did this article help you find a solution? (9 ratings, average rating 4.89 out of 5)
kb.paragon-software.com
CHKDSK From the Windows command line, we disinfect the hard drive
If your disk partitions begin to glitch, slow down, errors like “access to the folder is blocked” and similar messages begin to appear, and your hard drives begin to make non-human sounds like rustling and squeaking, then this can again be corrected with the CHKDSK command, which you can run not only from the recovery console as described in this article, but also through the Windows console for this we do the following.
1. Open the Start menu > All Programs > Accessories > Command Prompt

2. If you want to check the system drive (C:\), then simply enter chkdsk /r in the window that appears and press the Enter key

3. After which the message will appear (The CHKDSK command cannot be executed because the specified volume is being used by another process. Should this volume be checked the next time the system boots?) enter from the keyboard Latin letter Y and press Enter

4. We are informed that (This volume will be checked the next time the system is rebooted.) we reboot the computer

5. When the system boots, a blue window with a timer will appear, do not press anything, as soon as the timer reaches zero, the disk check will begin

6. After the check is completed, the computer will reboot itself, after windows loading errors on the section must be corrected

7. If not only your system disk is acting up, but also another partition, then run the command line again and enter the letter of the partition that you want to check in this way E: or D: that is, by analogy, substitute the letter you need and press Enter (the letter of the partition can be found out by going to My Computer, for example, in this case I’m checking the section with the letter E)

8. Enter chkdsk /r and press Enter (The entire line will look like this - DRIVE LETTER:\>chkdsk /r)

9. The message (Unable to perform chkdsk command on this volume, because The volume is in use by another process. To run Chkdsk, you must first unmount the volume. ALL OPEN VOLUME DESCRIPTORS WILL CONTINUE TO BE INCORRECT. Confirmation of disconnecting the volume) enter the Latin letter Y from the keyboard and press the Enter key

10. The process of checking and correcting errors will begin, after its completion you can close the console window (Percentages may reach a certain level and fall again, don’t worry, this is normal)
Were you able to solve the problem yourself? Write about it on the site and help other visitors. Publish an article