Lightweight wooden structures, which will be designed to store light gardening utensils, or will be set aside for poultry, for example, or small livestock, do not need a monolithic foundation. For such structures, a columnar foundation made of different materials is quite suitable. The most important advantage of such a foundation is its low cost compared to the monolithic version, and even a beginner in construction can build it! At the same time, such a foundation retains high performance characteristics.
The foundation on poles can be set up in any landscape, even on moving soils. Carrying out hydro and thermal insulation work when arranging such a foundation is not a necessary measure, installation is carried out even without outside help. As a supporting base, most often they create pillars of concrete, brick, natural stone, foam blocks, sometimes they use wood pillars. True, in the latter case, the posts must be burned and treated with special solutions that will reduce the degree of decay, otherwise the structure on such a foundation will not stand for a long time.
How to make a foundation from pillars - a step-by-step process
The process of erecting a foundation on pillars should be carried out in a few simple steps. The first stage is the preparation of the territory, which includes cleaning the area from debris, leveling irregularities and adding a gravel cushion, if the soil is clayey on the site. Then you need to make a markup, noting where which column will be located. Depending on how soft and mobile the soil is in your area, it is recommended to dig in the posts from half a meter to a meter deep.
On hard soils, the depressions do not need to be strengthened, but on soft soils, a layer of reinforced concrete should be made at the bottom of each pit to protect the structure from possible subsidence. After that, we proceed to the second step - we make the formwork. For this purpose, boards 15 cm wide and 4 cm thick are best suited.If you do not want to mess with the formwork for a long time, make it from asbestos-cement or iron pipes, but these options cannot be removed after pouring. After installing the formwork, reinforce it with iron rods installed longitudinally.
When the fuss with the reinforcement is completed, fill the future posts with concrete mortar with fine gravel. Try to tamp the grout as tightly as possible.
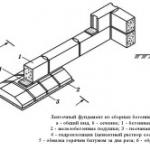
Then we proceed to the construction of the grillage - that part of the foundation on the pillars, which distributes the load evenly between all parts. Again, using wire and reinforcement, we connect the jumpers, make a frame from the same reinforcement and mount the formwork. We fill everything with concrete and wait until it hardens completely. If you do everything neatly and evenly, then on the resulting foundation you can build a structure for a shed.
Do-it-yourself foundation for a foam block shed - features
It is much easier and cheaper to build a strong and insulated utility block at once than to strengthen and insulate the structure during operation. In this regard, foam blocks are the most successful option, since foam blocks themselves are an excellent insulation, while solid enough to act as a material for masonry. Although foam blocks are a light material, a solid foundation is also needed for a foam block shed, and you can do it yourself, without the involvement of specialists. It is best to make a strip foundation, under which trenches no more than half a meter deep are dug - it makes no sense to make the foundation deeper, the structure will have a fairly light weight.
After the trenches have been dug, sand and fine gravel are poured onto their bottom, in a layer no thicker than 20 cm. The reinforcement frame can be made from rather thin rods with a cross section of 10 mm. After installing the frame, formwork is made from boards and concrete is poured. It is extremely important to fill the entire foundation in one approach, therefore, if you are doing work without special equipment, then you will need at least 3 assistants to quickly mix the solution and supply it to the trenches. It will take several days for the concrete to fully harden - do not forget to water it in hot weather with plenty of water so that it does not crack.
The foundation for a barn with your own hands is built in several ways. If you want this outbuilding to serve you for many years, you should treat the issue of building the foundation for it responsibly.
In private farmsteads there are often many outbuildings intended for various purposes. The most common of these is the barn. Usually it is a multifunctional structure that can be used to store a variety of working tools and household utensils, breeding domestic animals. Some owners set up a workshop in the barn.
Regardless of the specific purposes for which the described economic structure is used, it needs a qualitative foundation.
High-quality foundation of an economic structure
It is of course possible to build a barn without a foundation. But such a structure will not last long. The guarantee of the long-term operation of any farm building will be a solid and reliable foundation for it. It can be:
- tape;
- screw;
- columnar.
Any of the above foundations for an economic structure is carried out as simple and economical as possible. As a rule, the foundations for a shed or utility block go deep into the ground by no more than 0.6 m. They are erected according to simplified construction methods. Therefore, such structures cannot perceive truly serious loads. But in any case, buildings, even on a very light foundation, are much stronger and more durable than sheds built without a foundation. Remember this always.
Tape-type bases are most popular among summer residents and owners of private dwellings. Such foundations are allowed to be built on any soil, they can withstand quite large loads. True, the cost of their construction in comparison with other bases for a utility block is either higher.

Belt-type shed base
If you plan to spend a minimum of finance on construction activities, it is better to build not a strip, but another type of foundation. Fortunately, there is a large selection of them. For the rest, we will briefly describe how to properly erect such a structure. You can make a strip foundation yourself, relying on the following work algorithm:
- You dig a ditch about 0.7 m wide. You determine its depth based on how much the ground freezes in winter. The bottom of the base for an outbuilding should be slightly below the freezing level of the soil.
- Next, you need to make a pillow in two layers in the ditch - a 10-cm layer of rubble plus 5-8 cm of building sand. Then this cake should be well compacted.
- You are making. It is advisable to provide additional reinforcement for this structure. You need to make a simple mesh with cells measuring about 0.3x0.3 m from reinforcing bars of a small section (up to 1 cm). The formwork should protrude 0.25–0.3 m above the ground.
- Prepare a concrete solution and pour it into the prepared structure. The mixture for filling the formwork, without which the strip foundation cannot be built, can be made according to the classic recipe. Mix crushed stone with sand in a ratio of 5 to 3, add cement (1 part). Then fill this composition with water and stir it until the composition becomes homogeneous and thick enough.
You just have to wait for the high-quality hardening of the concrete mixture, dismantle the formwork and fill in the gaps left after removing the frame from the wood with earth. The strip foundation is ready. Such a base is recommended for loaded buildings, for example, for a utility block or a full-fledged home workshop.
Arrangement of a columnar structure requires much less labor and financial costs. Immediately, we note that it is impossible to erect such a structure on mobile soils. It is very easy to make a columnar foundation for a light utility block or similar building:
- You clear the area under the barn. On clayey lands, it is required to additionally equip a gravel cushion on the ground (thickness - in the region of 10 cm).
- Mark the site by determining the installation points for the columnar supports.
- Dig holes in designated locations. The depth of the wells is taken in the range of 50–100 cm. The softer the soil on the land plot, the more the supports should be buried.
- Pour a mixture of gravel and sand on the bottom of the pits (the total layer thickness should be about 15 cm), compact the made cake.
- Install the posts in the wells prepared for them. You can make supports from bricks, asbestos-cement pipes or from concrete blocks. The choice is yours. Experts advise placing an additional reinforcing bar inside the posts. Then their carrying potential increases significantly. Of course, if you are building the foundation for a very light shed, an additional rod is not needed.
- You make a simple formwork, fill it with a concrete solution.

Arrangement of a columnar structure
After 5-7 days, the concrete will harden and you will be able to build a barn on a prepared foundation.
Please note: if it was decided to make the pillars of bricks, the finished support must be treated with mastic with waterproof properties.
Relatively recently, outbuildings began to be installed on screw bases. Special supports, which are used for these purposes, have a special design with blades at the ends. Due to these elements, the screw rods are easily screwed into the ground by two adult men. There are no real difficulties in performing such work.
The piles are screwed in not by hand, but by means of a piece of a regular pipe or an iron crowbar, which are attached to the support through a special hole made in its upper part. Installation of screw products must be carried out strictly vertically. It is advisable that two people screw in the supports, and the third person from the side monitors the correctness of their installation.

Installation of screw products
When a structure is being erected on a site from foam blocks - a popular modern material for construction, the foundation for such a building is made according to the algorithm described for the strip base:
- Dig a 0.6-meter deep trench. Fill its bottom with gravel and sand (it is optimal to use materials of a fine fraction) with a layer of 15–20 cm.
- You make a reinforcing skeleton from rods with a cross section of 0.9-1 cm and a simple formwork from boards.
- Pour concrete, wait for it to harden, mount lightweight and durable foam blocks on the resulting base.
Choose the technology that suits you for erecting the foundation for the utility block and do all the work with your own hands, saving the family budget!
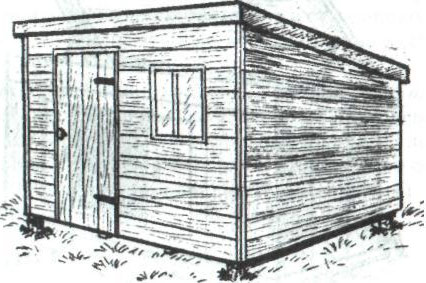
Building a shed with your own hands is not such a difficult task, but you cannot do without such a building on a personal plot, especially if the site is new and the construction of a house is still planned. During this time, the barn will become a haven for craftsmen, a storage for their tools, and later will be a workshop or a good warehouse for firewood and garden utensils. Therefore, it is necessary to start equipping the fenced area with the installation of this utility structure.
You can't install a shed where you have to - first you need to carry out zoning, since you need to remember that the building will serve for more than one year and can become an obstacle for other buildings, or spoil the planned landscape design of the territory. Therefore, it is necessary to set aside a place for it that will not be suitable for agricultural or decorative plantings, the device of a gazebo, a garage, a bathhouse, a toilet and other buildings. If you install a shed in the far corner of the site, it not only does not interfere with the work process, but also becomes a protection from prying eyes.
But if in the future it is planned to arrange a firewood in it, then you should not move the shed too far from the main building, since in winter it will be difficult to get to it, and firewood should always be at hand.
Block foundation
Installation of blocks in such a structure takes place on a monolithic base. If we are talking about the budget version of the basement, then it is allowed to use concrete blocks on a specially prepared pillow. In this case, a hole is dug to the size of the utility block, a layer of sand is filled up, spilled with water and compacted.
Then a layer of crushed stone, and also carefully compacted. On the constructed site around the perimeter, concrete blocks of the required size are installed, horizontally aligned with a level.

Construction of strip foundations
Before pouring the supporting structure, it is necessary to prepare a solid, tenacious mortar from a mixture of cement, water, sand and gravel. The following rules will help you to do this correctly:
- When buying dry cement or building mixture, be sure to pay attention to the date of production. Ordinary Portland cement will work here.
- To save cement, it is worth choosing gravel of different diameters with large and small stones. In this case, fine gravel will serve as a link for coarse gravel and less cement will be needed.
- Crushed stone should not contain debris and various impurities.
- Water should also be used clean, preferably drinking.
- The sand should be free from clay and silt.
- The classic recipe for mortar: 3 parts of sand, 5 parts of crushed stone, 1 part of cement - pour everything over with water, mix until a thick homogeneous mass is obtained.
Barn without foundation
Some lightweight buildings will not require a plinth at all. These include chest-type sheds or a combined greenhouse. They mainly store inventory, tools, garden accessories, plant germination, rooting of cuttings and other household needs.
Due to their small area and limited size, such structures have low ground pressure, and, accordingly, they can do without a foundation.
Another modern innovation is the pre-fabricated plastic shed. Every summer resident can build such a structure. The assembly is carried out like a children's designer, without the use of special skills and complex fasteners.
This building is a metal frame, the walls, roof and floor of which are made of durable frost-resistant plastic. Thanks to the built-in floor, the structure of the shed is protected from the ingress of groundwater. It will always be comfortable to work in, especially with well-designed ventilation. Even harsh winters and a heavy mass of snow will withstand well.
The undoubted advantages of this type of utility block are:
- assembly time - in the absence of experience, everything will take about three hours;
- such a structure can be moved from place to place;
- does not require maintenance - with careful operation, it will last up to thirty years;
- easy to clean with running water from a hose.
A solid foundation for a barn is half the way to a functional structure that can last for decades. Doing it yourself will not be difficult. It is only important to conduct a study of the soil to correctly determine the type of foundation, as well as to determine in advance the project, structure and purpose of the future building.
The device of the foundation is one of the most critical construction stages. The supporting platform largely determines the durability of both large-scale capital objects and small outbuildings. The barn cannot be classified as a demanding object in terms of the characteristics of the foundation, however, there are many important nuances in the technique of its construction. Moreover, this operation in most cases is implemented with a modest set of materials and technical means, which in itself forces the performers to look for ways to optimize work activities. To arrange a high-quality foundation for a barn, it will not be superfluous to use proven technologies for solving such problems at minimal cost.
Preparing for work
Before starting the construction of the foundation, it is necessary to carefully calculate the work plan. It is important to determine the site of the facility construction, area and orientation of technological points. An approximate layout of the barn will allow you to correctly position the supporting platform, regardless of what technology it will be carried out. In order to last longer and not be damaged at the very first stages of operation due to defects in the surface of the earth, it is important to clear the soil. The layer of vegetation must be eliminated and, if possible, make the rough surface not only even, but also tough. This may also require the removal of a loose soil layer or the use of a ramming tool. The way to achieve the desired characteristics of the base surface will depend on the quality of the soil itself.

Preparation of the solution
Almost all shed foundation methods require the use of concrete. To prepare the solution, you will need a basic set of water, sand and cement, but with the addition of gravel. The fraction of its elements can be any, but it is desirable to correlate it with the volume of the planned mass - the larger the pouring area, the larger the fraction. For example, gravel for a columnar foundation will have a minimum size, and for a strip foundation it is desirable to select a coarse fraction. It is important to observe the proportions for the mortar from which the foundation will be made; in a small container, sand and gravel should be stirred in a ratio of 3: 5, and then add 1 part of Portland cement. Water is added with the expectation of obtaining a thick, but tenacious mass.
Monolithic foundation device

This is a simple technique, but a fairly voluminous way of making a foundation. Its use is justified when it comes to the construction of a brick outbuilding. The essence of the technology lies in the construction of a solid sand cushion with the inclusion of the same gravel. About 10-15 cm, a base should be arranged, on which a cement screed will be organized in the future. But before that, a continuous formwork is formed around the perimeter of the working area, on which it is planned to install the foundation for the barn. Restrictive barriers are made with their own hands, within which the grout will be poured. They can be made of plastic or wooden slats with panels - the main thing is that they can hold the poured mass. After that, you can proceed to the installation of reinforcing bars and the direct screed device. It should be borne in mind that the full acquisition of the strength of such a foundation can take about 2-3 weeks, depending on the working area.
for a columnar shed?
A columnar foundation requires less materials in volume, but its implementation implies a more thorough calculation. Typically, a supporting base is formed, fixed on racks anchored in the ground. If we are talking about a small shed, then four pillars with a diameter of about 15 cm are quite enough. For each of them, a hole is initially dug into which a cushion of gravel and sand is poured. Next, the pillar rod is installed and filled with cement. If necessary, you can use special pile driving equipment. After that, the columnar foundation for the barn is covered with logs. The basis for the flooring will be formed by fastening structures, including the grillage strapping, channel and profile elements.

Strip foundation device technique
This type of foundation is one of the most common in the construction of residential private houses, but for outbuildings it is considered too troublesome and unreasonably expensive. To implement this technique, it is necessary to make excavation lines around the perimeter of the working platform. Trenches will turn out, which are covered with sand and gravel. For greater reliability, a reinforcing base is also carried out in the earthen niches. If a strip foundation is planned for a large barn, then trenches should be made in the central part. Further, the prepared niches with fittings are filled with the same solution. After the concrete has hardened, you can start work on the installation of the flooring, which can simultaneously act as the floor covering of the future shed.
How to make a foundation for a shed from foam blocks?

There are two widespread methods for constructing a platform for a foam block shed. In the first case, it is supposed to create contour bearing lines as a strip foundation. That is, a trench is made around the perimeter, which is filled with a combination of sand and gravel, after which blocks are laid on the cement mortar. Next, a bonding structure is formed for a flooring made of metal or strong logs. The second method is used when working with objects that are demanding in terms of resistance to high loads. In this scheme, the performer lays the foundation in blocks all over the site. The foam block itself is characterized by low thermal conductivity, insulating qualities, ease of processing and low price. Therefore, from the point of view of obtaining high performance of the barn as a repository of demanding materials, this option of the foundation may be the best.
How to choose the best foundation option?

Before analyzing possible options for a suitable foundation, you should decide on the tasks that the shed will perform and the conditions for its operation. For a small building in a warm region, a pile foundation with several load-bearing rods will suffice. Objects of a large area should preferably be built on a monolithic basis - for example, from a solid or in the form of a block platform. These techniques will allow you to build a durable and well-protected foundation for the shed in the lower part. With their own hands, the monolith is implemented with a standard set of tools, but it requires more physical effort. For example, laying a block may require the assistance of at least one partner.
Is it possible to build a barn without a foundation?
Of course, it will not be possible to do completely without a supporting base, but the optimization of this structural part of the shed in some cases justifies itself. So, if there are no strict requirements for thermal insulation, then it is quite possible to confine oneself to the installation of the frame on four concrete blocks, dispersed in the corners of the future building. You can make a shed without a foundation and on cleaned soil. These projects are typically prefabricated with a rigid timber or metal platform to replace the foundation. But it is important not to forget that the classic foundation also guarantees a horizontal surface. Therefore, it is important to initially adjust the roughing surface so that it does not have serious deviations in heights over the entire area.

Conclusion
It would be wrong to consider the foundation as a part separate from the main frame of the shed. Even a high-quality implementation of the base without taking into account the nuances of the further construction device can cause many problems during operation. The main thing that you should pay attention to when matching the foundation for the shed and its structural basis is the technique of forming an airtight bond. The transition is usually done from concrete or timber logs to metal profiles. Next, the main skin is made along which it can have several layers. Docking areas can be additionally treated with sealants, mineral wool and polyurethane foam.
Building a solid barn is not an easy task as it might seem at first glance. If you want the structure to serve you for more than a dozen years, take the matter seriously! We will consider what kind of foundation for a do-it-yourself shed is best suited for such structures.
1 Shed foundation - economy and practicality
Lightweight wooden structures that will be designed to store light gardening utensils, or will be set aside for poultry, for example, or small livestock, do not need a monolithic foundation. For such structures, a columnar foundation made of different materials is quite suitable. The most important advantage of such a foundation is its low cost compared to the monolithic version, and even a beginner in construction can build it! At the same time, such a foundation retains high performance characteristics.
The foundation on poles can be set up in any landscape, even on moving soils. Carrying out hydro and thermal insulation work when arranging such a foundation is not a necessary measure, installation is carried out even without outside help. As a supporting base, most often they create pillars of concrete, brick, natural stone, foam blocks, sometimes they use wood pillars. True, in the latter case, the posts must be burned and treated with special solutions that will reduce the degree of decay, otherwise the structure on such a foundation will not stand for a long time.

2 How to make a foundation from pillars - step by step process
The process of erecting a foundation on pillars should be carried out in a few simple steps. The first stage is the preparation of the territory, which includes cleaning the area from debris, leveling irregularities and adding a gravel cushion, if the soil is clayey on the site. Then you need to make a markup, noting where which column will be located. Depending on how soft and mobile the soil is in your area, it is recommended to dig in the posts from half a meter to a meter deep.

On hard soils, the depressions do not need to be strengthened, but on soft soils, a layer of reinforced concrete should be made at the bottom of each pit to protect the structure from possible subsidence. After that, we proceed to the second step - we make the formwork. For this purpose, boards 15 cm wide and 4 cm thick are best suited.If you do not want to mess with the formwork for a long time, make it from asbestos-cement or iron pipes, but these options cannot be removed after pouring. After installing the formwork, reinforce it with iron rods installed longitudinally.
When the fuss with the reinforcement is completed, fill the future posts with concrete mortar with fine gravel. Try to tamp the grout as tightly as possible.
Then we proceed to the construction of the grillage - that part of the foundation on the pillars, which distributes the load evenly between all parts. Again, using wire and reinforcement, we connect the jumpers, make a frame from the same reinforcement and mount the formwork. We fill everything with concrete and wait until it hardens completely. If you do everything neatly and evenly, then on the resulting foundation you can build a structure for a shed.

3 Do-it-yourself foundation for a foam block shed - features
It is much easier and cheaper to build a strong and insulated utility block at once than to strengthen and insulate the structure during operation. In this regard, foam blocks are the most successful option, since foam blocks themselves are an excellent insulation, while solid enough to act as a material for masonry. Although foam blocks are a light material, however, a solid foundation is also needed, and you can do it yourself, without the involvement of specialists. It is best to make a strip foundation, under which trenches no more than half a meter deep are dug - it makes no sense to make the foundation deeper, the structure will have a fairly light weight.

After the trenches have been dug, sand and fine gravel are poured onto their bottom, in a layer no thicker than 20 cm. The reinforcement frame can be made from rather thin rods with a cross section of 10 mm. After installing the frame, formwork is made from boards and concrete is poured. It is extremely important to fill the entire foundation in one approach, therefore, if you are doing work without special equipment, then you will need at least 3 assistants to quickly mix the solution and supply it to the trenches. It will take several days for the concrete to fully harden - do not forget to water it in hot weather with plenty of water so that it does not crack.
Most people believe that building the foundation for a barn with your own hands is elementary simple and does not take much time. For this to be so, it is necessary to carry out complex construction. After all, it must be done in such a way that the building does not collapse in two or three years.
Ready monolithic foundation for a barn
Before considering the types of foundations for a barn, you should decide on the type of this structure itself. The following are distinguished:
The type of foundation being erected directly depends not only on the strength of the future building, but also on the type of soil on which it is being built.

Consider the types of foundations for a barn that you can build with your own hands.
Fill foundation
Before laying the flood foundation for the shed, it is necessary to make a bedding, which will serve as an elevation above the ground by about 100-200 mm.
 Formwork for the installation of the flooded foundation
 Then a monolithic slab is installed: it will be the floor for the building. Such a floor will perfectly cope with any load and protect the building from all kinds of rodents.
Column foundation
Ideal and easy option for lightweight buildings. On such a foundation, you can make a building from foam blocks, but before starting construction, you need to investigate the soil composition: if it is homogeneous and compacted, then it is possible to make a foundation of bricks or foam blocks.
It must be remembered that building a foundation with your own hands is a work requiring patience. It is best to do a columnar foundation by pouring or using brick or concrete blocks, simply by installing them in the corners and in the places of the corner elements of the walls.
To build a columnar foundation, you need to do the following:

Block foundation
A foam block foundation is the best option for outbuildings. It is the most common because it is easy to use, suitable for mounting a base for all types of buildings, and quickly fits.

The not very high cost of a foam block foundation makes this building material even more popular. Moreover, it is quite lightweight compared to other materials.
To make the base of foam blocks correctly, you first need to mark the area. Next, drive in the stakes and stretch the cord between them. Then start digging a foundation pit with a depth of about 600 mm.
When calculating, one should take into account the width of the foam blocks themselves, increasing the width of the trench by 200 mm.
Pour rubble-sand bedding at the bottom of the trench, install the formwork, fill everything with concrete solution 200 mm high. Then, after waiting for the concrete to dry completely, you can install the required number of foam blocks and continue working further.
The foundation tape for the barn
When building sheds, a strip foundation is no less popular, since it is able to withstand different loads, is cheap, stable and allows you to make a basement inside itself.
 Scheme for the construction of a strip foundation for a barn
 This type of base is used on any soil and for any buildings.

Screw foundation
Although a relatively new technology, it has gained popularity in low-rise construction. Such a foundation is affordable, durable on almost any soil.
Rapid construction technology includes:
- Vertical installation of piles at marked points - the vertical is measured with a level. If the pile deviates even by two degrees, it must be unscrewed and installed correctly in another place, since the density of the soil has already been lost in this;
- The piles are screwed to the calculated depth using scrap or pipe in the corners and under the walls of the structure. At the same time, there will not be many problems: the screw piles are equipped with a sharp end and thread, which allow them to perfectly cut through any soil, except for rocky;
- All piles must be measured and brought to the same height with a grinder;
- For strength, the pile is filled with concrete from the inside. The foundation is ready, you can lay the stove.
Cinder block foundation
Cinder block is a cheap material that consists of slag, crushed stone, sand, cement and other components. As a foundation, it is perfect for small buildings.
But the cinder block foundation has its drawbacks:
- Hygroscopic due to the porosity of the structure;
- Has a high thermal conductivity;
- Not resistant to frost.
The scheme for erecting a foundation from a cinder block includes the following stages:

Important! To make the foundation lie flat, reinforcement is installed in the corners and a rope is pulled along it. In the future, masonry is carried out at this level.
Tire foundation
Recently, summer residents have widespread foundations erected from used material. For this, sleepers or tires can be used.
 Barn Tire Foundation Example
 Advantages of a tire foundation:
- Saving on materials;
- Rubber provides excellent waterproofing;
- Tires - strong and durable material;
- Tires can serve as a "cushion" in areas of seismic activity;
- Ease of manufacture.
An important nuance is that the tires must be located on the same level so that there is no distortion.
The tire foundation can be erected as a tape or columnar type. To build it, you need to clear the area, level the ground, put the tires in two layers - the best would be to use truck tires. Then, 80% of the tire volume is filled with soil inside the column.
Roofing material must be laid on top to ensure a flat surface and waterproofing. Then concrete can be poured. To increase the strength of the structure, concrete can be used instead of backfilled soil.  In addition to this, it is possible to apply reinforcement of the foundation made of tires.
One of the first buildings on a suburban area is a barn. A necessary and functional structure even before the construction of a house, because you always need to store somewhere a tool, firewood and other auxiliary utensils.
It is possible to independently approach the construction of a utility block. The main requirement for the reliability of future construction is a high-quality foundation base.
Features of building a foundation for a barn
For light change houses for inventory, no basis is allowed. If the building is more massive, then the basement must be completed.
The foundation gives the structure:
- Strength.
- Durability.
- Thermal conductivity.
- Frost resistance.
The first step is to correctly determine the location of the future barn. Arrange so as not to damage the landscape design of the site, for comfortable operation or on soil unsuitable for planting.
Then you can start choosing the type of base.

Reinforcement mesh for foundation
Dependence of the type of foundation on the type of building
The choice of the type of foundation depends on the design features of the future shed, as well as on the purpose of the utility block. Whether it will be a livestock room or a tool room with a workshop. All these functions performed will entail the choice of the type of foundation. So lightweight buildings do not require strong foundations, in turn, capital structures will require a reliable rigid foundation.
If the choice fell on a classic utility block made of timber with a gable or a pitched roof, any foundation will do. Most often, columnar or screw is chosen due to the low cost and relative ease of installation.
A solid structure made of bricks or foam blocks will require installation more, preferably a monolithic tiled or block base.
Barn foundation depth
The depth of the basement is selected for the type of foundation, as well as taking into account the local level of soil freezing. Important: trenches are dug 15 cm more than the depth of soil freezing.
Since the barn is most often a small-sized building, a shallow-buried foundation is quite suitable. Equally well suited for buildings made of wood or timber on clay or sandy soils. In this case, the hole is dug to a depth of about 60 cm.
For a more massive structure, for example, made of brick, as well as under conditions of unfavorable soil, it is worth placing the foundation to a depth of 100 cm.

How to choose a foundation for a lightweight building?
When stopping your choice, on any type of base, it is worth considering the basic characteristics of the soil at the construction site.
The following soil properties are taken into account:
- the presence of groundwater;
- compressibility of the soil;
- the presence of quicksands;
- type of soil.
According to the type of soil prevailing in the personal plot, the following types of socle are selected:
- On sandy soil, which can "float" under conditions of high humidity, it is more expedient to erect a screw or columnar foundation. The freezing characteristic of such soil is usually 40 - 70 cm, this should be taken into account when deepening the base.
- The worst option for construction is sandy loam and loam. Such soil has a high degree of freezing (up to 2 meters), the ability to swell and compress, often forms quicksand. For such a soil, it is worth choosing a screw base.
- Gravel soil is much less susceptible to freezing, is not subject to deformation and destruction, and is not subject to erosion. Here it is allowed to use both tape and columnar, and block views.
- The most favorable option for a construction site is rocky soil. It will not sink, freeze, and float. The only drawback of this soil is the laboriousness of processing, so any foundation can be installed, except for the screw one.
Required materials and tools
To save working time, as well as high-quality construction of the base, you should prepare in advance a set of materials and tools from the following list:
- water;
- cement with sand or specialized building mixture;
- concrete mixer - in extreme cases, you can do with improvised means, but it will significantly save labor and time for mixing the solution;
- bricks;
- metal fittings;
- asbestos pipes;
- waterproofing - plastic film or roofing felt;
- metal piles;
- Bulgarian;
- boards or plywood for formwork;
- foam blocks;
- Master OK;
- cord or twine;
- building level;
- pegs;
- rule;
- buckets and shovels (shovel and bayonet);
- roulette;
- ramming.
The list may vary depending on the type of base and the preparatory process.
Construction technology
Construction technology- a set of measures aimed at creating a structure that meets the requirements of the selected type of structure. Construction as a whole is a series of sequential operations.
First of all, this is the preparation of the site. The selected place is cleaned of grass, small shrubs, stumps, and a 10 cm layer of soil, carefully leveled. It is important to place the foundation on a flat surface to avoid further skewing of the structure.

Slab foundation
Detailed step-by-step instructions from marking to finished foundation
The first stage of construction is the same for all types of supporting structures - marking and routing. To do this, using a tape measure and wooden pegs, the corners of the future utility block are outlined. The stakes are driven into the ground, a rope or cord is pulled between them and leveled to adjust the horizontal. Right angles must be checked.
Column foundation
Future pillars are marked in each corner of the shed when building the simplest structure. If the project is more complex, then it is necessary to install pillars every 1 - 1.5 meters of the perimeter of the structure. With the help of a garden drill, wells about 40x40 cm wide are dug in the designated places.After that, a pillow of sand and crushed stone 20 cm thick is poured onto the bottom of each hole.
- Brick- the pillars are laid out with a standard masonry of one and a half bricks to the desired height.
- Concrete blocks- it can be one large block or small blocks, fastened with cement mortar.
- Asbestos pipes- they are installed in pits of the required size, later they are poured with concrete.
- - in this case, concrete is also poured into the prepared cavity. After drying, the formwork is removed.
For strength, reinforcement rods are fixed inside the pillars, if possible. Upon completion of the work, a layer of waterproofing is laid out on top to prevent moisture destruction.
Screw foundation
Such a structure does not require additional soil preparation, because mounts even on the most difficult soil types. It uses special metal piles with a sharp tip and cutting blades. The installation sites are outlined similarly to the columnar view.
Piles are driven vertically into the ground by two to three people . To facilitate work, a hole for scrap is provided at the top of each pipe. The entire structure must be vertically aligned. The parts that are superfluous in height are cut off with a grinder. For greater strength, it is recommended to fill the pile cavity with concrete.
Monolithic foundation
The most costly and time consuming, but the most durable and durable type of base. To build it, it is necessary to dig a pit according to the size of the intended barn. A layer of sand and a layer of crushed stone, 10 - 20 cm each, are laid on the bottom. Everything is carefully compacted. Next, you need to build a formwork with a height of 10 - 15 cm above ground level. Binding reinforcement or mesh is laid, and the solid space is filled with concrete.
Strip foundation
This type is intended for the basis of wall structures. A trench up to 50 cm wide is dug along the markings along the perimeter. It is important to observe right angles. The bottom is covered with sand and rammed. Next, a formwork is constructed, rising 20 cm above the ground. With the help of reinforcement and wire, a reinforcing cage is made. Then the entire tape is poured with concrete.
Block foundation
Installation of blocks in such a structure takes place on a monolithic base. If we are talking about the budget version of the basement, then it is allowed to use concrete blocks on a specially prepared pillow. In this case, a hole is dug to the size of the utility block, a layer of sand is filled up, spilled with water and compacted.
Then a layer of crushed stone, and also carefully compacted. On the constructed site around the perimeter, concrete blocks of the required size are installed, horizontally aligned with a level.

Construction of strip foundations
Before pouring the supporting structure, it is necessary to prepare a solid, tenacious mortar from a mixture of cement, water, sand and gravel. The following rules will help you to do this correctly:
- When buying dry cement or building mixture, be sure to pay attention to the date of production. Ordinary Portland cement will work here.
- To save cement, it is worth choosing gravel of different diameters with large and small stones. In this case, fine gravel will serve as a link for coarse gravel and less cement will be needed.
- Crushed stone should not contain debris and various impurities.
- Water should also be used clean, preferably drinking.
- The sand should be free from clay and silt.
- The classic recipe for mortar: 3 parts of sand, 5 parts of crushed stone, 1 part of cement - pour everything over with water, mix until a thick homogeneous mass is obtained.
Barn without foundation
Some lightweight buildings will not require a plinth at all. These include chest-type sheds or a combined greenhouse. They mainly store inventory, tools, garden accessories, plant germination, rooting of cuttings and other household needs.
Due to their small area and limited size, such structures have low ground pressure, and, accordingly, they can do without a foundation.
Another modern innovation is the pre-fabricated plastic shed. Every summer resident can build such a structure. The assembly is carried out like a children's designer, without the use of special skills and complex fasteners.
This building is a metal frame, the walls, roof and floor of which are made of durable frost-resistant plastic. Thanks to the built-in floor, the structure of the shed is protected from the ingress of groundwater. It will always be comfortable to work in, especially with well-designed ventilation. Even harsh winters and a heavy mass of snow will withstand well.
The undoubted advantages of this type of utility block are:
- assembly time - in the absence of experience, everything will take about three hours;
- such a structure can be moved from place to place;
- does not require maintenance - with careful operation, it will last up to thirty years;
- easy to clean with running water from a hose.
A solid foundation for a barn is half the way to a functional structure that can last for decades. Doing it yourself will not be difficult. It is only important to conduct a study of the soil to correctly determine the type of foundation, as well as to determine in advance the project, structure and purpose of the future building.