Many users actively use the webcam on their laptop. It allows you to communicate via video via various applications and instant messengers. True, not everyone can turn on the camera without problems. Although there is nothing complicated in the process of activating it. All you need is to know a few nuances and the version of the OS that is installed on the laptop.
However, all this is easy in words, but not in reality. Therefore, to make it easier for you, we will explain in detail in this article how to enable the camera on a Windows device.
Indeed, most laptop models are equipped with a built-in web interface. As a rule, it is located at the top of the screen. Moreover, the webcam lens is often miniature and invisible. Sometimes even so much that many users for a long time and do not assume the presence of such a device in the laptop.
So before you buy a webcam, take a look at your computer to see if you already have a built-in model. You can also check whether the laptop has a camera programmatically:

What if the line “Image processing devices” is there, but the webcam model is not registered in the tab that opens? Drivers need to be updated. This can be done either through the “Device Manager” or by installing the software from the disk that came with the laptop. You can also find and download the necessary drivers on the Internet. The main thing is to know the webcam model.
Features of turning on the webcam on a laptop with Windows 7 or 8
Owners of devices with “seven” often experience difficulties turning on and checking the functionality of the webcam. Indeed, unlike the previous Windows Vista OS, there is no corresponding “WindowsMovieMaker” application by default, which helps you quickly and easily turn on the camera.

WindowsMovieMaker interface
So users of laptops with Windows 7 need to use third-party software. For example, the Live Webcam application, which has a clear and simple interface. Some difficulties may arise only during its installation. Therefore, it is better to carry out the Live Webcam installation process as follows:
- Download the installation file from the Internet and unpack it.
- We start the installation of the program.
- At some point, a window will appear in which the system will ask whether you can allow this utility to change settings on the computer. We answer “yes”.
- Then you will need to click “accept” in the window with the license agreement.
- All that remains is to select the components to install and where to save the program. Then click “next”.
The popular Skype messenger will also help you turn on and check the operation of your webcam. All that is needed:
- Download and install it;
- Then go to the application;
- Select the “Calls” section and right-click on the “Video” icon;
- In the window that opens, click on the “Video Settings” line.

After which the camera will automatically turn on. Moreover, in the window that appears, you will see an image of yourself or what the lens is pointed at. By the way, through Skype you can adjust many webcam parameters, including brightness, contrast, saturation, etc.
Windows 8 also does not have standard programs for turning on the webcam. Therefore, on this RAM you can check its operation using the same applications as on the “seven”. You can also turn on the webcam on a laptop with Windows 8 through the “Device Manager” (you can find it - computer settings / control panel / hardware and sound).
How to enable the webcam on a Windows 10 laptop
The developers of this version of the OS have implemented a special service that is responsible for the operation of video communication tools. Therefore, no additional software is required to enable the webcam. You need to do the following:
- Open the Start menu.
- Click on the “All applications” item.
- Next, look for and select the “Camera” service.
- After which the camera should turn on and the corresponding image will appear on the screen.

If for some reason you cannot turn on the webcam on a laptop with Windows 10, then:
- Go to the start menu.
- Next, go to the “Settings” section, and from there to the “Privacy” subsection.
- On the left, click on the “Camera” line.
- At the top right of the window you will see a “slider button”. With its help, you need to allow applications to use the camera.
What is important to know?
- Depending on the laptop manufacturer, the methods for turning on the camera may vary. For example, on some models of Asus, Lenovo, etc., it is possible to activate it through hot keys. As a rule, this is Fn + one of the buttons from F1 to F12 with a camera icon.
- On a Toshiba laptop, turning on the built-in camera is not easy. Often, “native” drivers and a special program are required.
- On Samsung laptops and netbooks, the webcam sometimes produces a blurry and unclear image. The problem can be solved by installing drivers from the manufacturer's website. If this does not help, then pay attention to the lens itself - perhaps it is covered with a special protective film that simply needs to be removed.
- Sometimes on laptops (from any manufacturer - HP, Dexp Samsung, etc.) the webcam does not work because it is disabled in the BIOS. To enable it, you need to restart your computer. At the same time, during a new system boot, press F9 (on some laptops there is another key - Del, F1, F2, etc.) and go to the BIOS. Next, go to the Advanced section, select Onboard Device Configuration. Then select the Onboard Camera field. Change the value from Disabled to Enabled.
Many of modern laptops and netbooks have at their disposal the entire technological arsenal for comfortable work on the Internet. And, of course, it cannot do without a built-in camera, thanks to which the user can arrange video conferences and send photos and videos to their friends. But not all users know how to turn on the camera on a laptop. In this article you can find the answer to this question.
First, you need to make sure that the laptop actually has a camera built into it. It is most often located in the central part of the upper half of the laptop, directly above the device’s display. Sometimes manufacturers build in a small LED next to it (this is what will signal that the camera is on) or make a self-explanatory sign “Webcam” or “DigiCam” next to the device’s eye. If such signs of the presence of a camera could not be found, you can look for information about this in the passport or operating instructions of the laptop. After this, you can move on to the question of how to turn on the camera on a laptop.
Most often, the camera built into the device is launched by pressing a simple key combination. For example, on almost all Asus laptops this happens using the “Fn+V” combination (in this case, you can easily find the camera image on the “V” key). But don’t despair if you couldn’t find this combination on your device. There are several more options for how to turn on the camera on a laptop.
First, you need to make sure that all drivers and software for the built-in camera are installed. If any of the software is missing, you will need to go to the manufacturer’s website and download from there all the missing utilities and programs. Most often, laptops from popular global brands use software such as “Willing Webcam”, “Webcam Plus!” and “Active WebCam”, but other software may be suitable for a specific laptop model. After installing all the necessary drivers, the camera will turn on automatically immediately after launching the corresponding program.
But how to turn on the camera in a laptop if, after installing all the necessary software, it does not want to start? You can try to run installed program manually. To do this, you need to click on its shortcut or launch the corresponding utility from the start menu. In most cases, the camera on a laptop or netbook turns on immediately after this.
Another the right way To make the built-in camera work is to enable it from the “Control Panel” (the user will find it by left-clicking the famous “Start” menu). In the “Control Panel” we find a section called “Scanners and Cameras” and select the built-in camera in it. Once started, this device should turn on immediately.
If none of the methods described above helped achieve the goal, you can use one of the utilities from third-party developers. Hundreds of such programs can be easily found on the Internet, but before launching them, it is advisable to check all downloaded files with an antivirus. You can also visit the official website of your laptop manufacturer. Often on this resource you can find information about which third-party programs are ideal for a specific device model.
We should not forget that in some cases the user does not even have to rack his brains about how to turn on the camera on a laptop. The developers of popular programs for communicating via the Internet have already taken care of this. For example, after installing and launching one of the most popular communication programs called “Skype”, the laptop’s built-in camera will start automatically.
Now, almost all laptop models, from any manufacturer, are equipped with a built-in webcam. But there are also older models where there were no cameras, or perhaps there was a glitch in the operating system and the webcam does not work. What to do in such cases? How to launch the camera, where to click?
Today there are several ways to start a video camera. Moreover, the user must immediately determine for himself why he needs a camera on his laptop:
- for communication;
- for shooting videos or photos.
There are small nuances in choosing programs for a particular type of camera use. I would like to immediately make a reservation that any camera on a laptop should work by default. There is no need to perform any additional actions. Any video chat app should activate the camera without any additional movement.
How to turn on the camera via Skype
To run this application, first of all, you need to download and install it on your laptop. It is better to do this on the official website of the developer using the link - skype.
All the user needs to do is click the download button. Moreover, below there are buttons that allow you to download the application for other operating systems.
After this, the site itself will tell the user step by step what to do to connect the program and start communicating with friends.
So, the application is downloaded to the laptop. How to turn on the camera when working with Skype? It is important to note here that this application is intended primarily for free videos and audio calls. That is, the user can not only take photos and record video greetings.
After double-clicking on the Skype icon, the user enters the password and login of his account. If he did not log out of his account before closing Skype, then it will load without additional questions.
To check the operation of the webcam, just perform the following sequence of actions - click calls, select video, and right-click and select configure video.
After this, the camera will automatically connect and in the window that opens, the user will automatically see himself or whatever is in front of the camera at that moment. There is also an option to change your avatar, which will help you take several photos directly from the camera, and video settings will help you adjust the video signal.
Nothing special was needed to connect the camera.
Connecting the camera through other resources Built-in utility for connecting a web camera, software at least 7, at least 8 Windows versions
does not have. You just need to download the application. In addition to Skype, you can use another third-party application, for example, Live web cam. To download just click, and then unpack it. After this, the program asks the user if he wants to allow the downloaded program to change settings on the computer. The answer should be yes.
After this, the user should click the button to accept the license agreements.
After this, the user selects what he is going to do with the program and where to save it, and then clicks next.
After this, the program will prompt you to select a location where pictures and videos will be saved. The user will only need to specify the path to the folder. After this, a simple interface will open in which you can change the settings, take a photo and start self-recording.
Turn on the camera - reinstall the drivers
The second most common reason Laptop webcam not turning on, missing drivers. The problem here is that after the system crashed as a result of a breakdown or virus attack, and someone I knew restored the operating system to the user, half of the drivers were simply not installed. The operating system could have been installed old or unfinished.
To check the completeness and correct operation of the drivers, you need to launch the device manager. To do this, just press the Win and R keys simultaneously. And in the window that appears, type devmgmt.msc. As indicated in the picture.
After this, a dialog box will open for all devices for operating systems 7 and 8. After this, the user should view all devices in the window that opens. There should be no devices with a yellow exclamation mark.
If there are no such icons, then all the drivers are present on the laptop and nothing needs to be updated. But if there is, then you need to select this element, right-click, and select the command - update drivers.
If the drivers are not updated, then you need to go to the laptop manufacturer’s website and in the support section, download the necessary drivers.
For the most popular laptops, drivers can be downloaded from the links:
- Asus - link (you need to enter the model);
After downloading the drivers, it will be enough to restart the laptop, the camera should work.
Another variant of the problem is that the web is not enabled, i.e. disabled. If in Device Manager there is an arrow pointing down next to the webcam model, then the camera is not connected to this device.
This means you need to select the webcam and right-click to bring up a dialog box and in it the user selects the command - enable. After this, the webcam should work.
You can launch a webcam on the Windows 10 operating system using the Camera application. The user can learn how to do this, where, what to click, and also ask his question using these links to the office. website of the software manufacturer - Camera.
Webcam launch commands on the keyboard
There is a certain set of keys that help you quickly launch a webcam on different laptops. This is one of the most simple options activate and test the operation of the webcam without third-party services.
Each manufacturer has its own combinations, but sometimes they can coincide:
- FN and V, or through the start menu - Acer Crystal Eye (the software must be licensed and installed on the laptop by the manufacturer);
- FN and V or 3 simple programs that come with the software for the Asus laptop - ECap Camera, etc.;
- FN+button with camera - for HP laptops or a standard combination of buttons, or through the default program - HP Camera;
- Fn and Ecs for Lenovo laptops.
If none of the above methods to start the camera work, then you should have your laptop checked by a specialist. There may be something wrong with the equipment itself and will require repairs. Or you need to check for virus attacks.
How to turn on a webcam on a laptop is a very common and popularly asked question in Lately. The fact is that modern laptops and netbooks are equipped with built-in cameras so that the user can have a video conversation via the Internet from anywhere in the world. And today we’ll talk about the cameras that are built into laptops, how to turn them on correctly, and what to do if they don’t work. This information will be relevant for computer users. In this article I will talk about several activation methods, and also describe some possible malfunctions, making the camera’s operation not entirely correct. Let's go!
The first step is to contact owners of external webcams who are not satisfied with the quality of the built-in one. As a rule, such devices are connected via a USB cable, so if it does not turn on or is not detected, check the connection, try inserting it into another USB connector. Did not help? Or do you still have a built-in web camera? Maybe you forgot to install the drivers? Read on!
Drivers for webcam
Drivers are special utility utilities that “tell” the computer about a new connected device so that the system “understands” it and operates correctly. You probably have drivers installed on your laptop for a printer, scanner, or some other things? So, a webcam is no exception. It also needs its own drivers, and if you don’t have them installed, be sure to download them from the Internet and install them.
I would like to note that now you can very often find webcams that do not require special drivers from the manufacturer. It is enough to insert the camera into the desired connector, after which the system will install the drivers for the webcam, which were already preinstalled in the system. This especially applies to users who have Windows 7 and Windows 8 installed.
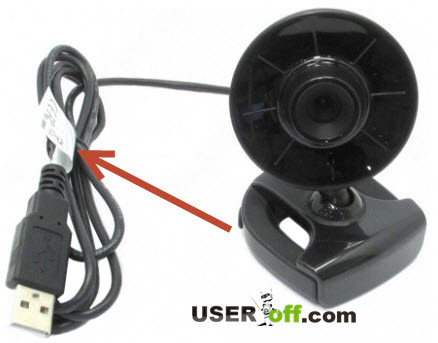
If you need to find a driver for a webcam, then don’t worry, finding them won’t be difficult, you just need to know the model of the camera, or the laptop if it has a built-in camera. In order to determine the model, pay attention to the packaging (when you bought it) of the webcam or on the webcam itself or on the wire; there may be a sticker in which the model is written, see the image below.
How to install drivers for a webcam
As an example, I decided to take a non-built-in webcam in a laptop so that you know how to turn on a webcam on a computer. So, if you know the model, you can now start searching. We type something like this into Google: “(driver model)” and you will be happy! In order not to be unfounded, let's look at a live example. I have an old web camera, for which we will now find the necessary driver.
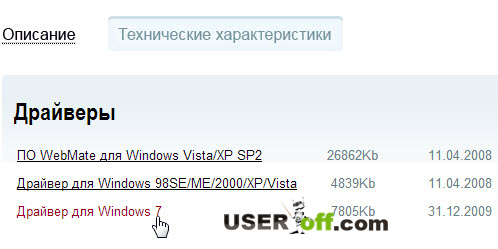
I recognized the camera model from the sticker. I go to Google and enter “ilook 300 drivers”, after which I look at the links so that they lead to the manufacturer’s website, and not some sharashkin’s office.

I opened two links, one in Russian and the other in English. Let's figure out how to download a driver for a webcam using the example of a Russian-language site. I go to the website, but there is no link to download drivers, so I click “Technical Specifications”.

This is where the drivers are located. I select the one I need and download it.
After downloading, we simply install them, agreeing to all the requirements and agreements in the software installation wizard. You can then restart your computer, although this is usually not necessary.
Skype can help you
What to do if the drivers did not help? How to turn on the webcam on a laptop then? Firstly, there is no need to remove them under any circumstances, let them be. And secondly, we should check the Skype settings and see if there is any signal at all or not. To do this, turn on the program, select “Tools” - “Settings” in the top menu. Next, in the “Basic” tab, click on the item: “Video settings”.
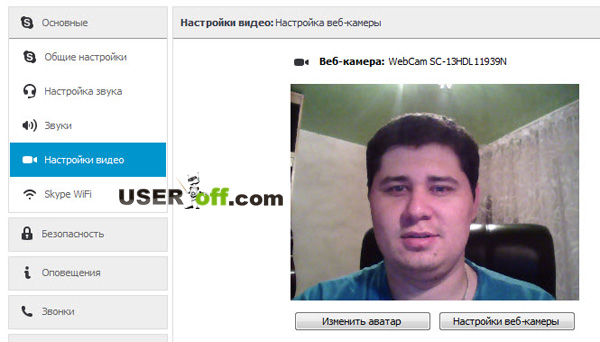
If you see a video broadcast in the window that opens on the right, then the camera is configured correctly. By the way, in this window you can also adjust the camera, for example, make the picture lighter or darker; if you play a little with these settings, you can improve your image.

And in the case when no video broadcast appeared, and instead you saw the message: “Skype did not detect a video camera,” then you have a problem either with Skype or with wires or connectors, which, by the way, is more likely.
Reinstall Skype, and if this does not help, deal with the technical side of the issue, and not with the software, since everything is fine with it. But let me remind you once again that the correct driver is the key to successful operation of the device. If you install the wrong driver or not for your system version, you will not see any image. Therefore, I advise you to install the correct driver for your webcam.
Additional options for turning on the webcam
You can also check the correct operation of the web camera using standard Windows tools. To do this, go to the Start menu - Control Panel - Hardware and Sound.
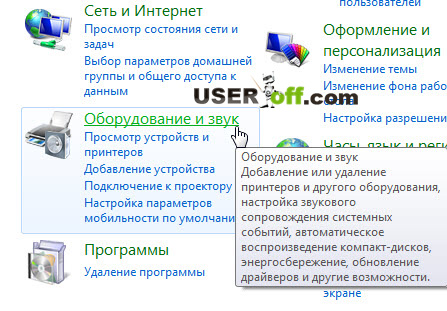
In the “Devices and Printers” section, select the “Device Manager” subsection. In the window that opens, look for “Image processing devices.” If you don’t have anything there, then the problem is really on the technical side.

You can try turning on and then turning off your webcam again. To do this, right-click on it and select “Disable”.

Reboot the computer. Then go back to the device manager and select “Enable” by right-clicking on the webcam.
The following information will be relevant for users who use the built-in web camera. Thus, I will show you how to turn on the webcam on your laptop. The following option can be proposed as a way to enable it. Among the F1...F12 keys, we are looking for the one with a blue icon with a camera on it. After that, press the combination of the Fn + desired key buttons. This way you activate and deactivate the webcam.
So, you understand how to turn on the camera on your laptop and computer. Now let's check it not through Skype.
There are special programs that are designed to work with web cameras, but to check the functionality of a web camera, Skype programs are usually used, or in other similar clients where video conversations are possible, for example Mail Agent.
Concerning online services, here we can cite as an example a world-scale project “”. Both sites offer their users to chat online with a randomly selected interlocutor from among those who are also currently on the site. It doesn't really matter, we're here to test the webcam.
I'll look at an example of the first service. Move your mouse pointer to the bottom left screen and click “Allow access to devices.”

A window will appear, select Allow and click Close.
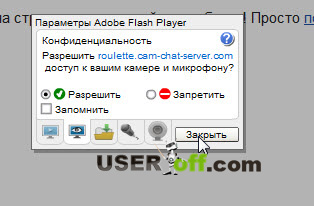
Basically, everything after which you can see yourself on the screen, which is what we needed.
Webcam program
I didn’t want to talk about the programs, but after finishing the article, I decided to add to the article. I think this addition will be important for some users.
The most popular, as I know, is the WebcamMax program. This program is paid, but for those who studied my video course and more experienced users, I think they understand how and where to get it.
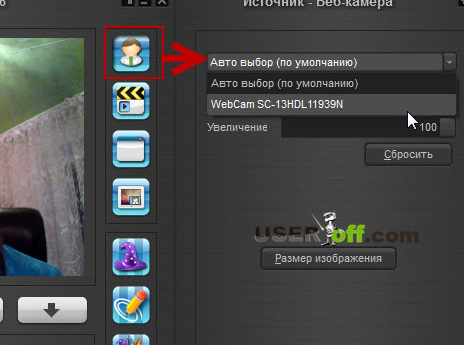
The program is simple, after opening, click on the “man” picture, a menu will appear on the right. Here you can select your webcam if it does not want to show.
The program also has all sorts of effects to apply to you. How to do it? Click on the cap.
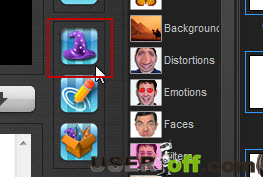
Effects that you can use will appear on the right.

To apply multiple effects, select 3 hats in the top menu, then navigate through the categories on the left, where there will be different overlays. The cool thing is that when you move your head, these overlays move with you. I experimented a little and this is what I came up with:

That's all I wanted to tell you on this topic. I hope that now the question of how to turn on a webcam on a laptop will no longer arise. If you can’t turn on the webcam, then you can try connecting it to another computer and check if it’s working. And don't forget that you need to install drivers.