can only be guaranteed if the version of it operating system iOS 3 or higher devices. If the OS version is iOS 2 or lower, then it is not safe to use the email program preinstalled on it. We recommend updating your iOS version.
Configure via IMAP protocol
2. Select Other.
3. Fill in the fields:

6. Go to Settings → Accounts & Passwords and open the account you just connected.

7. Go to Edit account.


10. Fill in the fields:

11. Click "Done".
12. Return to the Account menu. entry" and go to the "Advanced" section.

993 .

Configure via POP3 protocol
1. Open the default Mail app on your iPhone or iPad.
2. Select Other.
3. Fill in the fields:
4. An error message will appear. Select Continue.

5. Go to the “POP” tab.

6. Change data:

After connecting your mail, you need to set additional settings.
8. Go to Settings → Accounts & Passwords and open the account you just connected.
8. Tap SMTP in the Outgoing Mail Server section.

9. Proceed to edit the primary server.
10. Fill in the fields:
11. Tap Done.
12. Return to the previous screen and go to the “Advanced” section.

13. Check that in the “Inbox Settings” section the “Use SSL” setting is enabled and the server port is specified 995 .

Changing SSL settings
1. Go to Settings → Accounts & Passwords and open the account you connected.
2. Look at what you have in the “Host Name” field in the “Incoming Mail Server” section.

The mail program is configured using the POP3 protocol
2. Proceed to edit the primary server.
3. Fill in the fields:
4. Tap Done.
5. Return to the previous screen and go to the "Advanced" section.
6. Install:
The mail program is configured using the IMAP protocol
1. Tap "SMTP" in the "Outgoing Mail Server" section.
9. Proceed to edit the primary server.
10. Install:
11. Click "Done".
If the above settings are already installed in your email program, then no changes need to be made.
If you have problems setting up your email program, use our
Add to Apple gadget Mailbox, registered with Google (Gmail), AOL or Yahoo - a simple matter. However, when the need arises to add an account for a Russian-language mail service - for example, Rambler– to the user mobile device I have to rack my brains. The difficulty lies in the fact that when setting up mail on an iPhone, it is not enough to enter your login and password - the “ app Mail"requires you to provide information that is usually unknown to the average user. You will learn where to get such information and how to set up mail on iPhone successfully from this article.
If you are the owner of the now popular " googlemail", you can consider yourself lucky - in the iPhone, the settings of this email client are “hammered” by default, so you can do without “dancing with a tambourine.”
Adding a Google mailbox goes like this:
Step 1. Go to the program " Mail"on the gadget.
Step 2. From the options, select " Google».

Step 3. Fill in the fields " Name», « Email», « Password" In field " Description» the note “ will appear Gmail" You can change the text in this field yourself.

Step 4. After entering all the data, click " Further" - this will start the information verification procedure.
Step 5. At the next stage, the system will offer to synchronize contacts, calendars and notes between the mobile device and the email client. Move all sliders to the active position and click " Save».

After this, Google mailbox will be added to iPhone. Application " Mail" will immediately notify you of an incoming letter, which indicates that Google Mail was accessed from an iOS device.

How to set up Yandex.Mail or another Russian-language email service?
Adding Yandex.Mail is easier than other Russian-language service. The setup is performed as follows:
Step 1. Go to " Mail" and click on the option " Other».

Step 2. Proceed to the section " New account».

Step 3. Fill in the same fields as during installation Gmail.

Step 4. Set up synchronization of mail and notes - activate two toggle switches. Then click " Save».

There is no need to specify anything else - the Yandex mailbox will be added.
With clients Rambler And Mail.ru everything is more complicated: after filling out the required fields, the application “ Mail» asks you to provide mail server details.

Where can you get such information?
How to find out your mail settings through the Apple website?
Get data about servers to clients Mail.ru You can use the service on the official Apple website. The service is called " Search Mail settings "and is located at the link https://www.apple.com/ru/support/mail-settings-lookup/.
All that is required from the user is to “drive in” the address Email in the field (the only one) and press the blue arrow button.

Please note the note in small print below. According to this note, Apple may use the data users provide to it to improve the experience. This essentially means that the email address you enter will be saved in the company's database.
After a second of waiting, the service will display all the client data.
Which data is actually useful?
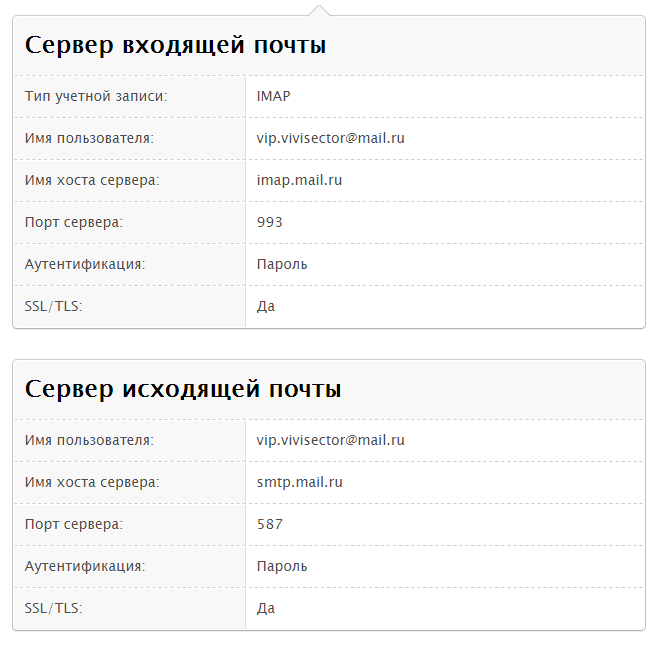
- In the block " Incoming mail server" in field " Node name"You need to transfer the server hostname ( imap.mail.ru). In field " Username» you should specify your email address – again. The password must be re-entered - this is an important point.
- In the block " Outgoing mail server"You can only fill in one field - " Node name" You should copy the server hostname here ( smtp.mail.ru). The remaining fields do not need to be filled in.
When you have completed the server settings, click " Further" At the final stage, you need to switch the toggle switches to synchronize notes and mail and click on “ Save».

The described method will give results if you are setting up a Mail.ru mailbox - but with Rambler it is more difficult. Service " Finding Mail settings"on the Apple website will not show information about Rambler Mail servers.

When setting up mail Rambler you need to do this:
- In the block " Incoming mail server" in field " Node name» should be entered pop.rambler.ru, in the fields " Username" And " Password“—respectively, the email address and password for it.
- In the block " Outgoing mail server" in field " Node name» needs to be registered smtp.rambler.ru. Other fields in this block can be left blank.
How to adjust email on iPhone?
The Apple device leaves the opportunity to customize email to suit the user's needs. It’s easy to find out what options are available to the owner of an iPhone by following the path “ Settings» — « Mail, addresses, calendars" and clicking on the name of the mailbox.

At the very bottom of the section " Account" there will be a subsection " Additionally“—you need to go exactly there.

In the subsection " Additionally"There are the following mail settings blocks:
Box behavior. Through the block " Box behavior» correspondence is configured between mailboxes on the iPhone and on the server. For example, with the configuration shown in the figure below, emails sent to " Cart"from iPhone will be saved in the folder " Outgoing" on server.

Where to move unwanted messages. If you set in this block " Archival box", but not " Deleted", emails erased via iPhone will be archived on the server - just in case.
Deleted messages. In this block you can set after what period of time letters from the mailbox will be deleted irrevocably. There is an option " Never"—for the most cautious users.

Setting up inbox. This block contains several parameters:

- Use SSL. If the slider is activated, emails are sent over a secure channel - as a result, you don’t have to worry about confidentiality.
- Authentication. You can configure the iPhone so that the user is authorized by mail not by entering a username and password, but in other ways - say, through MD5 Challenge response. It’s better not to mess with the authentication settings: entering a password is the easiest way to access your email.
- S/Mime. Option S/Mime allows you to send encrypted messages. Let us immediately note: in order to use S/Mime, you need to have a digital certificate.
There is no need to change anything in the “IMAP Path Prefix” and “Server Port” fields. The first field does not need to be filled in at all; the second field is filled in automatically when the user adds a mailbox.
How to sign out of mail on iPhone?
You need to delete your account from iPhone as follows:
Step 1. Go to " Settings" and look for the section " Mail, addresses, calendars».

Step 2. In the block " Accounts» Find the box you want to erase and click on it.

Step 3. On the next screen, click the button Delete your account».

Step 4. Confirm your intention to delete your account - click on “ Delete from iPhone».

When you delete your account from your mobile device, all information that was synchronized with your account will also be lost. Therefore, before erasing your account, make sure to transfer valuable information to a reliable medium.
Conclusion
Application " Mail» on iPhone allows add existing mailbox - here it is register a new one Using the built-in program will not work. However, this does not mean that creating an account on an Apple mobile device is impossible. Any of the popular email clients has its own application in the AppStore. By downloading and installing a third-party program, you can manage your email accounts without any hassle and create new accounts directly on your iPhone. Problems arise, as usual, only with Rambler / By mail: This client's application places high demands on the operating system of the mobile device - the iPhone must have iOS version not lower than 9.0.
It's very easy and convenient to read and send emails through the built-in application on your iPhone. This way you can always see the important letters that have come to you and easily write a response to them. But this method However, there is a minus: you cannot send photos from it. To use the built-in mail, you do not need to install any applications on your smartphone, but you will have to tinker a little with the settings for normal operation.
Yandex.ru is considered one of the popular email services among Internet users, so in this article I will try to describe this process in detail. For other email clients the principle is no different.
Setup instructions:
1. Let's go to " Settings" and find there the item " Mail, addresses, calendars».


3. In the next menu, click on the item “ Other" Alas, Apple does not favor Yandex.

4. Select " New account».

5. In the window that opens, you will need to fill in all the fields.

Name– your name, which people will see in messages from you.
Email– your mailing address, which was created for you on yandex.ru.
Password– Your real password for the mailbox.
Description – short description our account, enter yandex or yandex.ru
After all fields are filled in, click “Next”. Our mail setup will begin.
6. In the window that opens, click on “ Save».

7. In most cases, automatic settings are enough for mail to work correctly. Close “Settings” and go to our standard application “ Mail" All our letters should be loaded there immediately and for a more reliable check we send a test letter for reliability. If everything works, then the mail setup was successful.
If mail does not work, then you will need to delve a little further into the settings:
More precisely:
1. Let's go again to " Settings» — « Mail, addresses, calendars"—the mail we created.

2. In it, select SMTP, which is located in the “ Outgoing mail server».

3. If you already have a configured yandex.ru mailbox, then you just need to click on smtp.yandex.com which is located in the “Primary server” section (if you do not have mailboxes, then select “Not configured”, and in the “Node name” field write smtp.yandex.com. Next, save and click on smtp.yandex.com ).

4. We check that we have activated the “ Use SSL "and the server port is registered 465 . As you can see in the picture, my mail works well with the port 587 .

5. Click on " Ready»-« Back" and go to the tab " Additionally».

6. Make sure you have in the " Inbox settings"item activated" Use SSL "and the server port is registered 993 .

Now our mail is completely ready and ready to go.
I hope you found this article useful.
The Mail program (or Mail) is a standard application of the iOS system and does not require additional installation from App Store. However, to work with the mail client, you must first carry out the “Mail” setup procedure. This article will discuss all the possible stages of setting up an email client using the native Mail application as an example.
Standard Mail setup on iPhone/iPad
To configure the email client, go to “Settings” -> “Mail, addresses, calendars”. Here the user is given a choice of services, such as Google, Yahoo, iCloud, Outlook and so on. To connect a service account that is not included in the general list, you need to click on the “Other” button, however, in this case, the procedure for connecting an account may differ from the standard one.
Having selected a service in which you already have an account, you need to tap on its logo, and then indicate the basic information of your account: name, e-mail, password. After checking the information, if there are no errors, the Mail application will be ready to use. But don’t rush to leave the “Mail, Addresses, Calendars” section. Here you can also customize some design styles, notifications, signatures and other little things.
By the way, if necessary, it is possible to add several accounts of various mail services at once.

Adding an account for Tut.by, Rambler, Yandex, etc. to the Mail app on iPhone/iPad
You can add a Tut.by or Rambler account to the standard iOS mail client “Mail” only by linking the server address. To do this, in the service selection window, click “Others”. In the menu that appears, enter your name, email and password.
- Mail.ru - pop.mail.ru
- Yandex - pop.yandex.ru
- Rambler - pop.rambler.ru
- Tut.by - pop.gmail.com
- Mail.ru - smtp.mail.ru:25
- Yandex -smtp.yandex.ru
- Rambler - smtp.rambler.ru
- Tut.by - smtp.gmail.com
If you encounter the error “The server rejected the recipient because. it does not allow relay" or "Relay error" in your email client, check that the information is filled in correctly.
As a final step, in the last settings menu that appears, we indicate those sections that we want to synchronize with the mail service (contacts, calendars, etc.), save all the settings made and check the operation of the mail. If an error occurs in the operation of the mail service, try repeating the entire procedure again. Perhaps you just missed something at one of the stages.

Also check that in the settings of your mail account, in the “outgoing mail” section, in the “primary server” item, the use of SSL is activated. If this does not help and mail continues to not work on your iPhone or iPad, then, in the same section, change the numerical value of the server port to 465 or 25.
Google two-step verification: setting up mail on iPhone or iPad
Often, Gmail users activate the two-step verification feature to increase the security of their Google account. From the moment it is turned on, the active mail account on the iPhone and iPad stops working, displaying the error "The username or password you entered is incorrect". In this case, re-entering the password or checking the username (just in case) does not bring any benefit.In this case, you need to do the following:
Step 1. Log into your Google account through a browser and go to the “Security” section.
Step 2. Look for the line “Two-Step Verification” and go to “Settings”.

Step 3. You will be prompted to enter your Google account password, after which you will be taken to the settings for this function. We need a second tab “Application Passwords”. Click on the “Manage application passwords” button and enter the password again.

Step 4. We see a list of all applications that have access to your Google account and mail, including. Here you can give access to the Mail application on your iPhone and iPad. To do this, click on the “Applications” menu, select “Mail”, and on the right, click on the “Device” menu, select iPhone or iPad and click the “Create” button.

Step 5. After all the manipulations, instructions will immediately open containing a new password for setting up an account on your device.

Following the instructions, go to “Settings” -> “Mail, addresses, calendars”, select your Gmail account from the list and change the password to the one specified in the instructions. Ready!
Email clients from the App Store
Despite the presence of quite high-quality staff on iOS, they are not bad alternative options may become: Mailbox, myMail, Boxer (lite version available) and standard clients from Google, Yandex, Yahoo and so on. Each application has a unique design and boasts interesting features that will make working with emails much easier and more convenient. The choice is yours.If you haven’t found an answer to your question or something didn’t work out for you and there’s no answer in the comments below suitable solution, ask a question through our . It's fast, simple, convenient and doesn't require registration. You will find answers to your and other questions in the section.
Hi all! In the era of widespread use of fast messaging services (WhatsApp, Viber, Telegram are the most prominent representatives), fewer and fewer people are using email. But this does not mean that everyone has forgotten about it and that it has forever lost its relevance. Nothing like this! Moreover, if you set up your mailbox correctly and correctly, then using it will be a sheer pleasure.
And the question immediately arises - how to do this? How to properly connect mail on your iOS device? Elementary. Just. Easily. Don't believe the author? Then get detailed instructions on setting up email on iPhone or iPad. It's time to start - let's go! :)
- Using the built-in Mail application.
- Using additional programs from a third-party developer.
Setting up a standard email client in iOS
Like any self-respecting smartphone (meaning iPhone) or tablet (iPad), there is already a pre-installed (no need to download it) program for working with emails; we just need to configure it correctly.
Click on the “Mail” icon on the desktop or go to Settings - Mail, addresses, calendars - Add account. The result will be the same - you will see this window:
If your email account belongs to one of the services (the whole thing is written about iCloud) that are indicated in the picture, then this is the simplest option. Click on the desired icon, enter your username and password, the operating system will do the rest for you.
But of course, in Russia, mail services from companies such as Yandex, Mail.ru, and probably Rambler are more common. If you are one of the majority of people who use them, then manual configuration will be required.
In the same window as in the picture above, click “Other” - “New account” (first line), the form opens:

- The name is absolutely any, as you please.
- E-mail - directly the address of the electronic mailbox.
- Password - I think everything is clear, the password is for the email.
- Description - Additional Information(personal, work, trash, etc.).
That's all if you use @yandex or @mail (and its derivatives - inbox, list, bk).
To configure @Rambler (and others - lenta, autorambler, myrambler, ro.ru, r0.ru) you will have to tinker a little. After entering the basic data (as written above), you will need to provide additional information:

- Incoming mail server. Node name – pop.rambler.ru
- Username and password are your email box. Important! Specify the username in full, for example, [email protected].
- Outgoing mail server. Node name – smtp.rambler.ru
That's all, now your iPhone or iPad (all settings are identical) is ready to receive emails using the standard Mail program.
Third-party programs for checking mail on iPhone and iPad
For those who for some reason are not satisfied with the method described above, there are a huge number of applications for checking letters on iOS devices in the App Store (and there are several of them!).
I won’t be able to tell you about each of them, but I’ll highlight the two most popular among them and, importantly, free.