The cat is one of the most favorite animals among children. Cats attract them with their fluffy fur and affectionate playful disposition. In ancient times, cats were considered sacred animals. And still some people are convinced that these animals can heal people.
It doesn't take much skill to draw a cat. With the help of video and photos, we will see step by step how you can easily and beautifully depict the figure of a cat.
1. Draw a circle, from which we lower an oval, widened at the base. We get the head and torso of the cat.
2. Draw triangular ears on the head.
Stage 1-2: draw the head, ears and body
3. From the middle of the body, draw the paws with four lines.
 Stage 3: adding paws to the body
 4. On the muzzle we add eyes, a nose and a mustache.
Stage 4: draw the face5. All that remains is to draw the raised tail.
Stage 5: draw the tailWe color and tint our cat. The result is a drawing like this.
Stage 6: color the cat
Graceful kitty
In the following steps you can draw an elegant cat. There is a photo and video detailed instructions how to draw a cat with a pencil.
1.Draw an oval and divide it into four parts by two perpendicular lines.
Stage 1: draw an oval with lines
2.Slightly sharpen the corners on the sides, add a nose, mouth and ears.
Stage 2: sharpen the corners, draw ears and nose
Stage 3: finishing the eyes
4. We lower another circle down - the body - and two paws.
Stage 4: draw the torso and front legs
5.On top we draw the base of the ovoid body with the pointed end up.
Stage 5: finishing the torso from behind
6. Draw paws and a tail at the base.
Stage 6: add a ponytail and hind legs
7. Tint the top of the muzzle and tail.
Stage 7: color the cat
We get a beautiful charming cat.
Little kitty
Now let's depict little kitten. To draw the figure of a cat correctly and beautifully, consider the instructions, photos and videos. Here's how to draw a kitten with a pencil step by step.
1.Draw two circles one above the other: one bigger size, and the other smaller.
Stage 1: draw two circles: head and torso
2. On the muzzle we depict eyes, a nose and a tongue, and on top – two ears.
Stage 2: draw the face and ears
3. The next step is the front and hind legs, tail.
Stage 3: draw the front legs Stage 4: draw the hind legs Stage 5: complete the tail
In the picture there is such a baby kitten.
Ready kitten
How to draw a cartoon kitten:
cartoon pussy
You can draw a cartoon cat for children in an easy and original way in four steps. The video and photo provide detailed instructions on how to do this step by step.
- We draw a circle beveled at the top - the head - and an ovoid body.
- Add a raised tail.
- We draw the eyes and nose, and use a curved line to divide the body in half.
- We depict the cat's pupils and whiskers.
- Color the picture in purple shades.
This is how you can quickly and beautifully depict a cartoon cat.
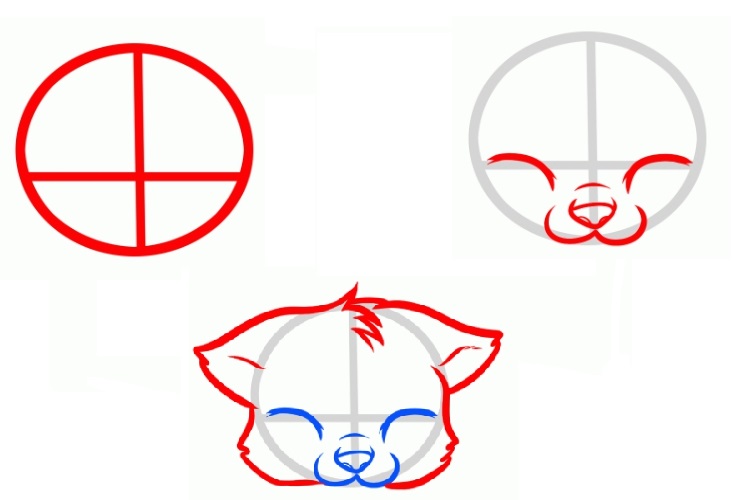
Muzzle
If you do not want to depict a cat in full height, you can draw only the animal's face. Let's see how to draw a cat's face step by step. The drawing is easy and accessible even for children.
- We draw a circle and divide it into four unequal parts with two smooth lines.
- We place the nose and mouth in the center, and to the right and left of the center are the cat’s eyes.
- On the head in the form of two triangles we depict the ears, below - the contours of the neck.
So, it won’t be difficult to draw the animal’s face beautifully and correctly.
To profile
To depict the cat's face in profile, we start with the same circle. Divide the circle in half horizontally. We draw in the ears and lengthen the circumference with the contours of the nose. On the line we draw the eyes and nose, a little lower - the mouth. We clarify the contours of the ears and remove the circle. We get an easily and beautifully drawn face.
Stages of drawing a cat's face in profile
With kittens (1st option)
It will be interesting for children to draw a cat with kittens. However, the drawing is complicated by the fact that in this case you no longer need a separate figure, but a whole composition. You can easily and correctly depict a cat with kittens in stages as follows.
1. Draw an oval (the body and the center of the composition), and a circle on the bottom right.
Stage 1: draw an oval and a circle
2. At the next stage, draw the head and contour of the body.
In this lesson I will tell you how to draw a cat step by step for a child. Quite often, children are faced with a problem when they are just beginning to develop their creative abilities, and the object of drawing is very complex. In our lesson we will easily draw a simple but beautiful cat step by step.
We will get this drawing:
And at the very end of the lesson we’ll draw this cutie:

Let's start drawing the cat. If you are drawing with a child, explain to him what parts the cat consists of. In our case, we start drawing from the head - it has a round shape, slightly elongated to the sides.

After the circle is drawn, we proceed to drawing the cat's body. We draw two curved lines from the head, and on the side – two semicircular lines indicating the cat’s hind legs.

What kind of cat is without ears? Therefore, tell your child that ears are a must. Draw a pair of ears on top of the head in the form of triangles.

At the bottom of the cat’s muzzle we draw a nose in the form of a triangle, and from it – two curls, indicating the cat’s mouth.

On top, draw cat eyes with your child - they are not round, but pointed at the corners and slightly slanted. The pupil has an elongated shape.

Now draw the cat's paws as shown in the bottom picture. We will draw three fingers on each paw, and if your cat is angry, advise your child to draw claws.

And of course, any cat just needs a tail - draw it on the side.

We add fluffiness to the cat by drawing fur on the chest and on the paws.

Our cat is almost ready, we just need to add a few details - fur on the ears, whiskers and a bow. Your child can add some of his own details at his own discretion - for example, draw a bowl of milk or a mouse next to it.

I hope you liked the lesson and learned how to draw a cat with a child step by step. If you like to draw with children, I advise you to visit my website.
Let's try to draw a few more cute and cute cats with step-by-step diagrams. First, let's draw a realistic, full-length cat using a step-by-step guide with pictures.

The first step is to mark the sheet to indicate the proportions of the cat. Our base will consist of several figures - I draw the shape of the head, body, and triangles of ears on top. Look, it’s already starting to resemble a drawn cat! Try to keep the base lines barely visible, this will allow us not to be distracted by them in the future. Next, I begin to draw the cat's face. It is somewhat pointed, with a nose and mouth located in the lower part of the muzzle. Just above the nose we draw the shape of the cat’s eyes.
Now let's start drawing the cat's ears. I add vertical pupils as well as whiskers. The next step is drawing the paws. Notice how they are located in the picture below.

Now we need to draw the back, hind legs and tail of the cat. I also add touches that will make the cat more detailed. We remove the extra lines, outline the contours and, if desired, color our beauty. This is the cat we managed to draw!

Now let's try to draw a cute cartoon kitten. The drawing is very simple, even a child can handle it!
Let's draw a large oval. Kittens always have quite large heads in cartoon drawings, we will also use this technique. Next I draw lines - they will indicate the body and tail.

Next I will draw ears for our kitten and give a shape to the tail. It turns out pretty cute! Now our cat needs to draw a face - I draw two big eyes, and between them I add a nose and a mouth. A couple of lines on the top and on the ears.

Let's draw the cat's pupils shifted to the right, add antennae and start working on the paws. First the front ones, and then the rear ones. Now I want to add stripes to the cat's head and tail.

At the last stages, you can outline the sketch and get rid of unnecessary lines. I decided to draw the cat in purple and pink tones, and made the eyes green. The cat looks somewhat unusual, but that doesn't make it any less wonderful. What happened to you?
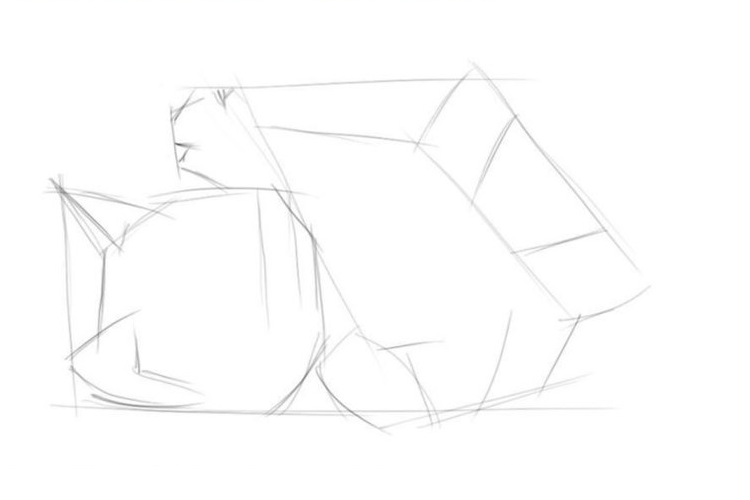
The next cat will be a little more difficult to draw, but believe me, it will be worth it. First, let's mark the sheet with these figures. Practice on a rough draft; after a few attempts you will definitely get it beautiful and neat. Also actively use the eraser, removing unnecessary unsure lines.

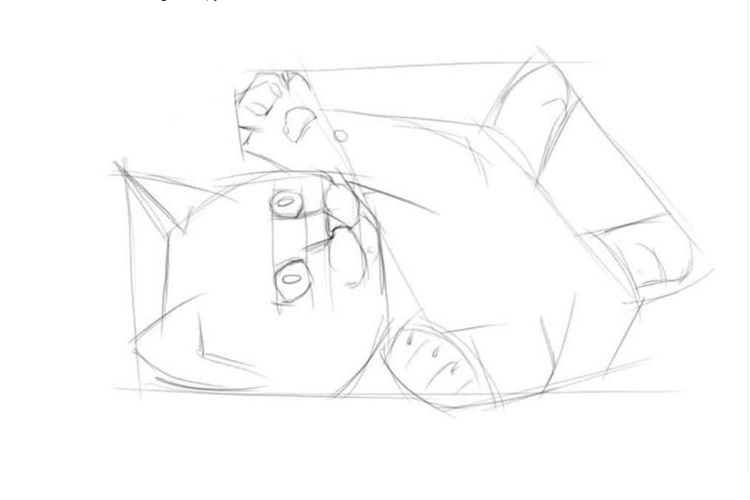
Let's draw a figure located under two triangles. In the very center where our lines intersect, draw a nose and mouth. The cat's eyes are closed - it seems that she has warmed her sides in the sun and is simply glowing with pleasure! 
The ears need to be detailed. We shade the side parts with parallel strokes.

We begin to shape the muzzle. We draw on top of the sketch, but now the lines are smoother. I also drew mustaches.

Now we begin to draw the cat's body. She lies with her back to us, so there is no need to draw her paws. I add a few strokes to the place where the spine will be located, this will allow you to immediately understand in what position the drawn cat is lying.
Cats are incredibly graceful and beautiful animals, so drawing them is a real pleasure. For beginning artists who have recently begun to master graphics, master classes on how to draw a cat with a pencil step by step are suitable.
Creating such cats does not require skill, talent or artistic taste. If a child asks to draw a cat, and time is short, then you can limit yourself to funny images.
Sleeping kitten
Anyone can easily draw such a sleeping miracle. All you need for this is an A4 sheet, soft and hard pencils, an eraser, a little patience and perseverance.
Stage 1: We start drawing a sleeping cat from the head. To do this, draw a circle with a hard pencil and mark thin auxiliary lines. The vertical divides the muzzle clearly in half, and the horizontal goes so that the upper part accounts for more than half of the circle.
Stage 2: Focusing on the auxiliary lines marked in the first stage, we outline the kitten’s eyes, nose and mouth.
Stage 3: Mark the outline of the head with a soft pencil. We draw the ears, protruding fur, and a funny “whirlwind”.
Stage 4: draw the body of the animal and draw the tail. Please note that the kitten is curled up into a ball, so the tail covers part of the muzzle.

Stage 5: At the last stage, the paws and whiskers are drawn. Use an eraser to carefully erase any excess lines and markings. The kitten is ready. If desired, you can color it with paints or colored pencils, or leave it as is.

Mischievous kitten

Any child will love this naughty baby. You need to start drawing a mischievous kitten from the head. Draw a circle, add triangular ears and draw a muzzle. Then comes the drawing of the torso and paws. Play with the kitten's emotions and show your child that the mood of the cat shown in the picture depends on small details. Surprise can be conveyed through wide-open eyes; a protruding tongue will add mischief, and by moving the pupils slightly to the side, you can make a thoughtful or sad cat.
Kitten made of circles

Even a child can make this drawing of a cat from circles with a pencil, since it is one of the most simple ways for beginners. The animal is drawn from the back, so there is no need to draw features and maintain proportions.
First, two circles are drawn on the sheet so that they slightly intersect each other. In this case, the diameter of the lower one should be approximately twice as large as the upper one. Then the ears are drawn to the upper part, and the tail to the lower part. Then the mustache is drawn and the fur is randomly marked.
One circle, two circle
Another clear example of how you can quickly and easily draw a cat with a pencil.
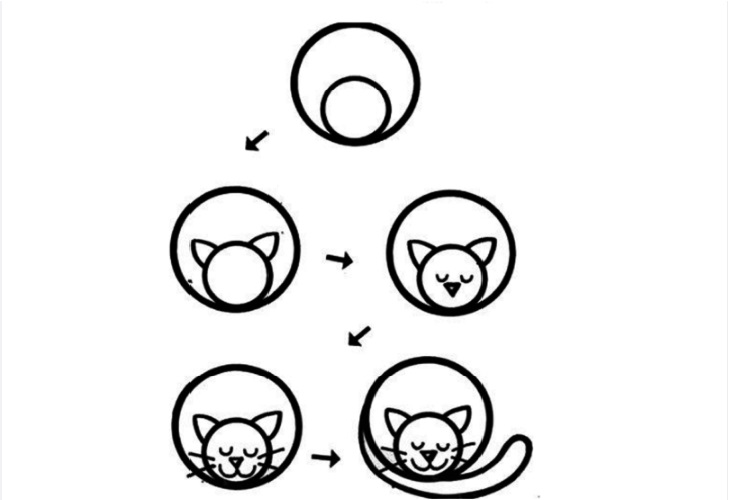
The larger circle is drawn first, and then another, smaller circle is drawn inside it. Add ears, facial features and a tail. Children will love a funny sleeping kitten and can quickly distract a child and cheer him up.
Such a sketch is something between simple schematic images and realistic drawings of animals.
We mark the outline of the animal with thin auxiliary lines made with a hard stylus. The sketch of the head looks like an octagon, the ears are triangles, and the body is a rectangle or cylinder. After this we make markings for the paws.
We draw a horizontal line in the center of the head, thus indicating the level of the eyes. We draw sketches of the mouth and nose, round eyes. We draw a chin and mustache.
We define the muzzle more clearly. We draw in detail the eyes, nose, mustache and cheeks. Using a soft pencil, draw fibers on the ears, head and muzzle. Then we draw the front paws with claws and pads, and detail the hind paws.

On final stage All auxiliary lines are carefully erased. It's time to draw fur. For these purposes, a 2M (or 2B) lead is best suited, but in principle you can use any soft one.

Realistic
Many people think that realistic pet portraits are not the easiest task for beginners, but in fact, not all sketches are difficult. You can verify this using the example of step-by-step instructions for a portrait of a Scottish Fold.
Draw a Scottish fold cat with a pencil
Scottish Folds are loved by many breeders for their disposition and charming appearance. Thanks to distinctive feature breed - with ears curved forward and down, these cats look so cute that it is impossible to resist squeezing such a mustache. We offer a simple step-by-step lesson for beginners on how to draw british cat pencil step by step.
At the first stage, auxiliary lines are drawn with a hard pencil: 1 vertical and 2 horizontal. The vertical one shows the center of the muzzle, so it needs to be slightly shifted to the right relative to the center of the page, since the cat is sitting slightly turned.
The horizontal ones should be parallel to each other, as they indicate the size of the animal's eyes. After this, you need to start drawing the contour of the muzzle and eyes.
Important! For a cat to be proportional, the distance between the eyes must correspond to the size of the eye.
When drawing a nose, remember that its size should be less (narrower) than the distance between the eyes.

Then, using an M or TM stylus, we darken the eyes and nose. More experienced artists who are confident in their movements can use a black pen for these purposes.
To make the cat’s look “alive”, do not forget to leave unpainted, white areas, as in the picture.

For the third step, you will need a 2M (or B2) pencil. Carefully, using smooth lines, shading the strokes, darken the areas around the pupils. Notice how the color goes from darkest (around the pupils) to lightest. Then, with a hard stylus, arrows are marked in the direction from the nose. They show directions for drawing fur.

Using the softest stylus (it is better to use B4 or 4M), focusing on the arrows, draw the darkest fur. The crown and fur under the ears should be the darkest.

To complete the picture, draw in the remaining fur. The cat is ready
Attention! The color of the bristles depends on the force of pressure.

This tutorial is aimed at beginners, so if you're looking for a challenging cat anatomy, then you shouldn’t read it.
Everyone loves cats:3 We'll look at four basic cat poses.
Sitting cat in profile
Let's start with the simplest thing - this is a sitting cat in profile. If you have a cat, then you probably guessed that this is not the cat's favorite position. They usually lie down or generally sleep.
1. So, first we draw the ear and the top of the head.
2. We continue to work on the cat’s head and draw the back of the head.
3. Next, draw the neck and back of the cat. See the little curved line that comes out from the back of your head? This is her neck. Then we draw a line going down - this is her body. The body line ends where her tail then begins. 
4. Draw the cheeky face of the cat and draw a curved line down. The curve represents the cat's chest. Also, at this step we draw a curved line that looks like half a circle - this is the cat’s future paw. 
5. Draw the paws as shown in the picture. ![]()
6. We finish drawing the tail, eye and additional ear. 
7. The sitting cat is ready, if you want and if you know how, you can add shadows for volume. 
Cat looking straight into your soul
This pose is the most difficult to draw. The cat sits and looks at you, with its head slightly pressed to the ground.
1. We need to draw three circles that will overlap each other. The smallest circle is the cat's face. We divide this circle in half, this is necessary for easy drawing eyes, nose, mouth and mustache. Next we draw the most big circle- the main part of the body. Middle circle, most which is almost invisible - the back of the body. 
2. Divide the circle of the head in half again and draw ears. Based on our circle, we make lines that will slightly increase the width of the head. Then we begin to draw the cat's mouth and nose. Don't forget to draw the two front legs and the tail. 
3. In this step we draw the cat's face in detail. We draw eyes, nose, mustache. Draw the fur as shown in the picture and draw the ears. 
4. We work on the front legs and tail. We draw the lines of the paws closer to the side of the head and cover them with fur, draw the claws. Cover the tail with fur. 
5. We complete our drawing. We delete all the auxiliary lines, cover the cat with fur and add shadows. Our cat is ready! 
Standard cat pose
We have come to the most favorite pose for cats - a lying cat: 3
1. As with the previous cat, we first draw the main circles. This time there are two of them, a small circle is the head, a large circle is the body. 
2. As with the previous cat, we divide the head into four parts and in the lower part we draw another circle, divided into four parts. Let's draw on the ears. 
3. Using ovals, draw the paws as shown in the figure.
4. Sketch out the eyes and nose. 
5. Erase the auxiliary lines, draw in the fur, draw the claws, and if you wish, you can color our cat. 
standing cat
1. First, let's draw the auxiliary figures of our cat. Draw a rectangle, connect the right corners of the rectangle with a curved line, draw a circle to the upper right corner and draw an oval at the back of the rectangle extending beyond the rectangle. 
2. We work on the head and neck. To draw a beautiful neck, you need to connect the head and body with two lines above and below. We draw on the ears, eyes and nose. 
3. Draw the paws using ovals as shown in the figure and mark our future tail with a line. 
4. We finish drawing the tail and draw our cat in more detail. 
How to easily draw a cat with a pencil step by step - for children and adults. Learn to draw a beautiful cat with a pencil step by step together with your child. Find out how to quickly and easily learn to draw a beautiful cat.
To make it easy for a child to draw, for example, a cat, we will tell you how to draw a cat step by step. Draw with your child, then it will be easier for him to remember and master the drawing of a cat.
Take a sheet of paper and a pencil and start drawing with your child, controlling and prompting him. At the top of the sheet of paper, draw a circle so that it is slightly extended to the sides.
Then draw two curved lines from the circle down, from these lines just below half of the curved line draw two more curved lines, these lines will represent the cat's hind legs.
So, you have the body of a cat and the hind legs of a cat.

Now you draw the cat’s ears; they look a little like triangles with curved sides.

Look with your child at the lower part of the cat’s face, here you need to draw a nose in the form of a triangle, draw two curls from the nose - this will be the cat’s mouth.

Now the cat needs to draw eyes. The eyes should be semi-oval with pointed corners at the edges. Inside the eye you need to draw circles, and inside the circles you need to draw a pupil, it should be elongated.

Look carefully at the drawing, your cat doesn’t have enough paws, now let’s draw the paws. Draw four paws for the cat, each paw should have three toes.

Now the cat needs to draw a tail. The tail should be drawn on the left side of the cat. The cat's tail should be slightly fluffy.

Your cat is almost ready, but to make her look more beautiful, add a little fluffiness on her chest and legs.

Now draw fluffy ears, whiskers on the cat and draw a bow for the cat for beauty.

Well, your cat is ready, near the cat you can draw a ball, a ball that she plays with, or a mouse.
Another step-by-step drawing of a cat
Now let's see step by step how you can draw another cat in a different way.
Let's see how you can draw a full-length cat in another way, for this we offer you step by step instructions and visual pictures.
Take a sheet of paper and a pencil, first you need to mark the sheet of paper so that the cat fits in completely.
First, let's draw the cat's head. Look carefully at the following picture and draw the cat’s head exactly as shown in the picture, now draw triangular ears, look carefully at how the body is positioned and draw exactly the same.
Apply the lines of the sketch of the cat with thin strokes, so that later you can adjust, erase and draw further.

A little above the nose, draw the cat’s eyes; they should be in the form of an oval with pointed ends.
Now pay attention to the cat’s ears, they need to be corrected a little so that they turn from simple triangles into beautiful ears, draw a mustache and finish the cat’s eyes, draw her vertical pupils.

Now you should start drawing the cat's body, look carefully at the picture and draw the cat's front legs and toes.
Look at the next picture, now you need to finish drawing the cat’s back, tail and draw her back legs. Add a few touches to the cat that will make it more cute and expressive.
Remove the lines that interfere and are unnecessary in your drawing, outline the outline of the cat more brightly, paint your cat in any color you like.

This is such a beautiful cat you have.
Courses for the development of intelligence
We also have interesting courses that will perfectly pump up your brain and improve your intelligence, memory, thinking, and concentration:
Development of memory and attention in a child 5-10 years old
The purpose of the course: to develop the child’s memory and attention so that it is easier for him to study at school, so that he can remember better.
After completing the course, the child will be able to:
- 2-5 times better to remember texts, faces, numbers, words
- Learn to remember for a longer period of time
- The speed of recalling the necessary information will increase
Secrets of brain fitness, training memory, attention, thinking, counting
If you want to speed up your brain, improve its functioning, boost your memory, attention, concentration, develop more creativity, perform exciting exercises, train in game form and solve interesting problems, then sign up! 30 days of powerful brain fitness are guaranteed to you:)
Super memory in 30 days
As soon as you sign up for this course, you will begin a powerful 30-day training in the development of super-memory and brain pumping.
Within 30 days after subscribing, you will receive interesting exercises and educational games in your email that you can apply in your life.
We will learn to remember everything that may be required in work or personal life: learn to remember texts, sequences of words, numbers, images, events that happened during the day, week, month and even road maps.
How to improve memory and develop attention
Free practical lesson from advance.
Money and the Millionaire Mindset
Why are there problems with money? In this course we will answer this question in detail, look deep into the problem, and consider our relationship with money from psychological, economic and emotional points of view. From the course you will learn what you need to do to solve all your financial difficulties, start saving money and investing it in the future.
Speed reading in 30 days
Would you like to quickly read books, articles, newsletters, etc. that interest you? If your answer is “yes,” then our course will help you develop speed reading and synchronize both hemispheres of the brain.
With synchronized, joint work of both hemispheres, the brain begins to work many times faster, which opens up much more possibilities. Attention, concentration, speed of perception intensifies many times over! Using the speed reading techniques from our course, you can kill two birds with one stone:
- Learn to read very quickly
- Improve attention and concentration, as when fast reading they are extremely important
- Read a book a day and finish your work faster
Conclusion
Learn to draw yourself, teach your children to draw, to draw a cat step by step, it took you a little time, but now you know how to draw a beautiful cat. We wish you good luck in your future works.